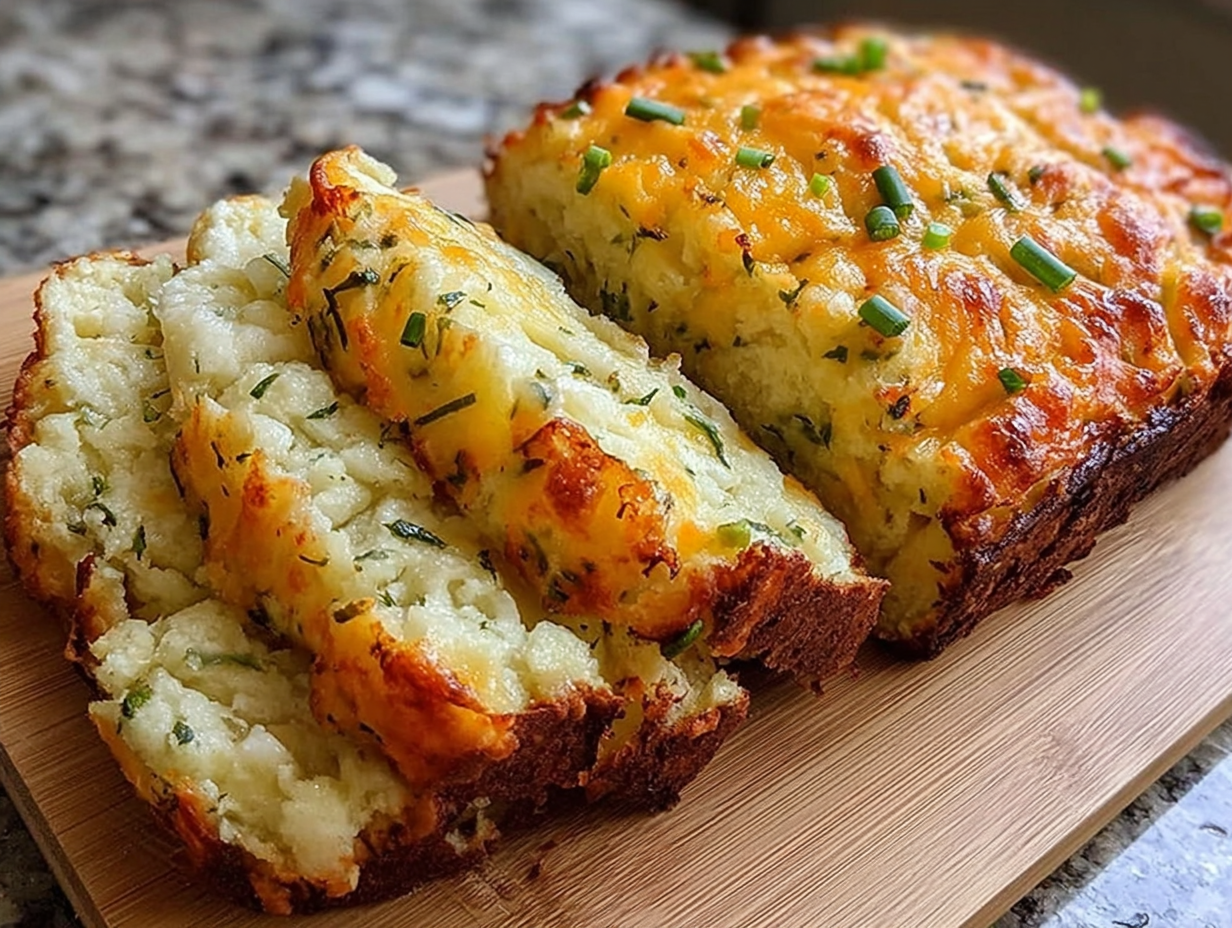
There’s something uniquely comforting about the smell of bread baking, a scent that promises warmth and satisfaction. This easy cheese bread recipe is my go-to for capturing that feeling without the fuss of yeast or long proofing times. It’s a simple, no-knead quick bread that comes together in minutes and bakes into a golden loaf with a wonderfully crisp crust and a soft, tender crumb absolutely packed with cheesy flavor. It’s the kind of recipe you turn to on a chilly afternoon when you need a little pick-me-up, or when you need a simple side to round out a soup or salad dinner. It feels like a small victory every time I pull it from the oven.
What I love most about this recipe is its straightforward nature. You don’t need any special equipment or baking expertise. It’s really just a matter of mixing the dry ingredients, mixing the wet, and then gently combining them before baking. This makes it a fantastic recipe for beginner bakers or for those times when you want a homemade treat without a huge commitment. This savory bread is incredibly versatile, perfect for breakfast toast, a satisfying snack, or as a delicious companion to your favorite main dish recipes. It’s a humble loaf, but one that never fails to impress with its rich flavor and delightful texture.
Ingredients for This Cheese Bread
One of the best things about this cheese bread recipe is its simple and accessible ingredient list. You likely have most, if not all, of these items in your pantry and refrigerator right now. There’s no need for a special trip to the store to enjoy a warm, homemade loaf. We’re using basic staples like all-purpose flour, baking powder, and an egg to create a wonderfully tender and moist crumb that provides the perfect base for the star of the show the cheese. The choice of cheese is entirely up to you, which allows for great flexibility. A sharp cheddar will give the bread a classic, tangy flavor, while a mozzarella will provide that irresistible cheese pull. You can even use a blend of your favorites to create a more complex flavor profile.
The melted butter adds richness and depth, ensuring the bread is flavorful and never dry. Milk provides the necessary moisture to bring the batter together, contributing to the soft texture of the final loaf. This recipe is a fantastic example of how simple ingredients can combine to create something truly special. It’s a testament to the idea that you don’t need a complicated recipe to produce delicious, satisfying results. It’s just good, honest baking that feels both comforting and rewarding, making it one of my favorite easy casserole companions.
- All-Purpose Flour: 2 cups provide the structure for our bread.
- Baking Powder: 1 tablespoon gives the bread its lift, making it light and airy.
- Salt: 1 teaspoon enhances all the flavors.
- Shredded Cheese: 1 cup of your favorite, like sharp cheddar or mozzarella.
- Melted Butter: 2 tablespoons for richness and flavor.
- Milk: 1 cup to moisten the batter.
- Large Egg: 1, to bind the ingredients and add to the texture.
Why does this recipe use baking powder instead of yeast?
This recipe uses baking powder as a leavening agent, which makes it a “quick bread.” Unlike yeast breads that require kneading and time to rise, quick breads are fast and simple. The baking powder reacts with the liquid ingredients to create carbon dioxide bubbles, which cause the bread to rise in the oven. This means you can have a fresh loaf of cheese bread ready to eat in about an hour.
How to Make Cheese Bread Step-by-Step
Making this homemade cheese bread is a delightfully simple process, perfect for a spontaneous baking session. The key to a tender loaf is to handle the batter as little as possible. Over-mixing can develop the gluten in the flour, resulting in a tough or dense bread, and nobody wants that. We’re aiming for a light, fluffy texture that lets the cheese flavor shine. The instructions are designed to be straightforward and foolproof, guiding you to a perfect loaf every time. Start by getting your oven preheated and your loaf pan ready. This ensures that as soon as the batter is mixed, it can go straight into the oven to get the maximum lift from the baking powder. This is a great recipe to make with kids, as the steps are simple to follow and the reward is a delicious, cheesy treat.
You’ll first combine all the dry ingredients, which ensures the baking powder and salt are evenly distributed throughout the flour. Then, you’ll stir in most of the cheese, saving a little to sprinkle on top for a beautiful, golden crust. The wet ingredients are whisked together in a separate bowl before being gently folded into the dry. Remember, a few lumps in the batter are perfectly fine. Once it’s in the pan and topped with that last bit of cheese, it’s ready for the oven. The aroma that fills your kitchen as it bakes is absolutely heavenly and part of the joy of this simple recipe, which works well with many chicken dinner recipes.
- Prep Your Oven and Pan: Preheat your oven to 350°F (175°C). Grease and flour a 9×5 inch loaf pan.
- Mix Dry Ingredients: In a large bowl, whisk together the all-purpose flour, baking powder, and salt.
- Add the Cheese: Stir in about 3/4 cup of the shredded cheese, reserving the rest for the topping.
- Mix Wet Ingredients: In a separate smaller bowl, whisk together the milk, the large egg, and the melted butter until well combined.
- Combine Wet and Dry: Pour the wet mixture into the dry ingredients. Stir with a spatula until just moistened. Do not overmix; the batter should be lumpy.
- Pan and Top: Scrape the batter into your prepared loaf pan and spread it evenly. Sprinkle the remaining 1/4 cup of cheese over the top.
- Bake to Perfection: Bake for 35-45 minutes, or until a wooden skewer or toothpick inserted into the center comes out clean and the top is golden brown.
- Cool Down: Let the bread cool in the pan for about 10 minutes before carefully removing it to a wire rack to cool further. For best results, allow it to cool for at least 20 minutes before slicing.
Tips & Tricks for the Best Cheese Bread
Over the years, I’ve learned a few things that really elevate this simple cheese bread from good to absolutely fantastic. The most important tip, which I can’t stress enough, is to avoid over-mixing the batter. A lumpy, slightly shaggy batter is your friend here. When you mix flour with liquid, you start developing gluten. A little is good for structure, but too much will make your quick bread tough and dense instead of tender. Mix only until the streaks of flour disappear. This gentle handling is the true secret to a perfect crumb. It’s a simple trick that makes a world of difference and ensures your bread has that light, melt-in-your-mouth quality that makes it so irresistible.
Another great tip is to grate your own cheese. While pre-shredded cheese is convenient, it’s often coated with starches to prevent clumping, which can inhibit melting and give a slightly powdery texture to your bread. Grating a block of sharp cheddar or Gruyère yourself will result in a richer flavor and a much better melt. Finally, don’t be afraid to let the bread cool. I know how tempting it is to slice into it the second it comes out of the oven, but letting it rest for at least 20 minutes allows the crumb to set. Slicing it too hot can cause it to be gummy and fall apart. A little patience pays off with clean, beautiful slices. This makes it a perfect side for various chicken breast recipes.
My cheese all sank to the bottom. How can I fix that?
This can sometimes happen if the batter is a bit too thin or if the cheese pieces are too large. To prevent this, try tossing your shredded cheese with a tablespoon of the flour mixture before adding it to the batter. This light coating helps suspend the cheese within the batter, ensuring it’s evenly distributed throughout the loaf instead of sinking.
Substitutions & Variations for Cheese Bread
This cheese bread recipe is a fantastic canvas for your culinary creativity. While it’s wonderful as is, it’s also incredibly easy to adapt with different flavors and ingredients. The cheese itself is the most obvious place to start. For a bit of a kick, try using a pepper jack or a spicy habanero cheddar. For a more sophisticated, nutty flavor, Gruyère or a high-quality Parmesan would be excellent choices. You can even combine cheeses for a more complex and layered taste. Think about what you’re serving the bread with; an Italian herb blend and Parmesan cheese would be a great variation to serve alongside pasta dishes.
Beyond cheese, there are plenty of other add-ins that work beautifully. For a savory, herby loaf, try adding a tablespoon of chopped fresh herbs like rosemary, chives, or thyme. A few cloves of minced garlic or a teaspoon of garlic powder can also be added for an extra flavor boost. For those who enjoy a bit of texture and richness, stirring in some crispy, crumbled bacon or diced jalapeños along with the cheese can take this bread to a whole new level. These additions make it more than just a side; they turn it into a standout component of any meal, perfect for an Al Fresco dinner.
- Spicy Version: Add 1-2 finely diced jalapeños and use pepper jack cheese.
- Herb Garden Loaf: Mix in 2 tablespoons of fresh chopped herbs like chives, parsley, and rosemary.
- Garlic Cheese Bread: Add 1 teaspoon of garlic powder or 2 cloves of minced fresh garlic to the dry ingredients.
- Bacon Cheddar: Stir in 1/2 cup of cooked, crumbled bacon with the cheese.
- Whole Wheat Flour: For a heartier loaf, you can substitute up to half of the all-purpose flour with whole wheat flour.
Frequently Asked Questions
How do I store leftover cheese bread?
Leftover cheese bread should be stored in an airtight container or a zip-top bag at room temperature. It will stay fresh for up to 3 days. If you want to enjoy a warm slice, you can toast it lightly or warm it in the microwave for a few seconds.
Can I make this recipe into muffins?
Absolutely! This batter works perfectly for muffins. Simply divide the batter evenly among a greased or lined 12-cup muffin tin. Bake at the same temperature (350°F / 175°C) for about 20-25 minutes, or until a toothpick inserted into the center of a muffin comes out clean. They make a great grab-and-go snack or breakfast.
Can I freeze this cheese bread?
Yes, this bread freezes very well. Allow the loaf to cool completely, then wrap it tightly in plastic wrap and then in a layer of aluminum foil. It can be frozen for up to 3 months. You can also freeze individual slices for a quick and easy snack. Thaw at room temperature or toast directly from frozen.
Conclusion
There is such a deep sense of satisfaction that comes from baking, and this easy cheese bread recipe delivers that feeling every single time. It’s a simple, honest loaf that fills your home with an incredible aroma and provides a delicious, comforting treat for you and your family. It’s proof that you don’t need complicated steps or fancy ingredients to create something wonderful. Whether you enjoy a warm slice slathered with butter alongside your morning coffee, pack it as a snack, or serve it with one of your favorite chicken dishes recipes, this bread is sure to be a hit. I hope this recipe becomes a staple in your kitchen, a reliable friend you can turn to whenever you need a quick, savory, and utterly satisfying bake. Happy baking!
Easy Cheese Bread
Ingredients
Equipment
Method
- Prep Your Oven and Pan: Preheat your oven to 350°F (175°C). Grease and flour a 9×5 inch loaf pan.
- Mix Dry Ingredients: In a large bowl, whisk together the all-purpose flour, baking powder, and salt.
- Add the Cheese: Stir in about 3/4 cup of the shredded cheese, reserving the rest for the topping.
- Mix Wet Ingredients: In a separate smaller bowl, whisk together the milk, the large egg, and the melted butter until well combined.
- Combine Wet and Dry: Pour the wet mixture into the dry ingredients. Stir with a spatula until just moistened. Do not overmix; the batter should be lumpy.
- Pan and Top: Scrape the batter into your prepared loaf pan and spread it evenly. Sprinkle the remaining 1/4 cup of cheese over the top.
- Bake to Perfection: Bake for 35-45 minutes, or until a wooden skewer or toothpick inserted into the center comes out clean and the top is golden brown.
- Cool Down: Let the bread cool in the pan for about 10 minutes before carefully removing it to a wire rack to cool further. For best results, allow it to cool for at least 20 minutes before slicing.