There are sandwiches, and then there are sandwiches. The kind that makes you pause after the first bite, close your eyes, and just enjoy the moment. This Chicken Caesar Sandwich is definitively the latter. It transforms the classic, beloved salad into a handheld masterpiece, combining the satisfying crunch of perfectly breaded chicken, the creamy, tangy goodness of a homemade Caesar dressing, and the fresh crispness of romaine lettuce, all piled high on a crusty baguette. It’s the kind of meal that feels both incredibly indulgent and surprisingly straightforward to whip up in your own kitchen, turning an ordinary Tuesday lunch into something truly special.
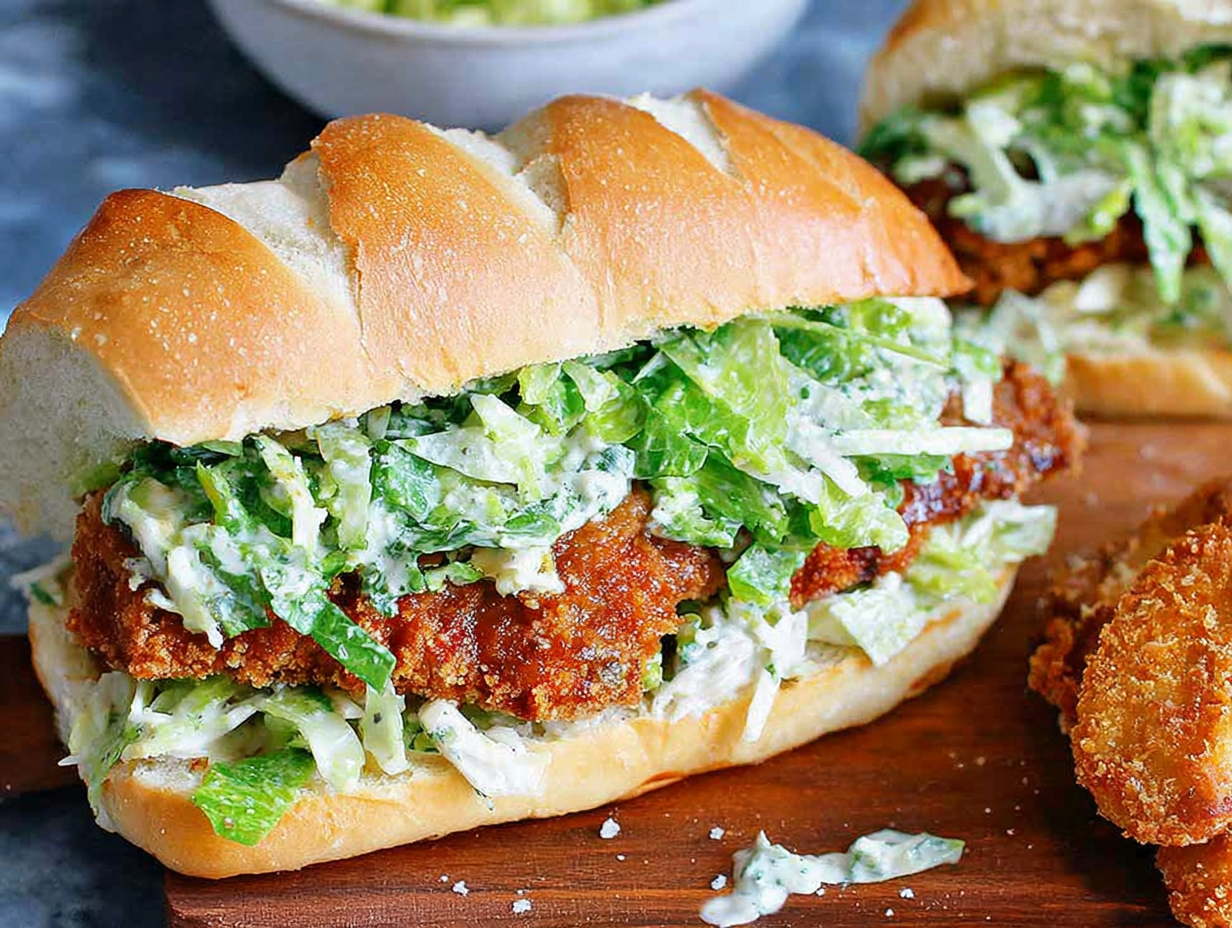
Forget those disappointing food court versions with limp lettuce and questionable dressing. What makes this recipe shine is the attention to detail in each component. The chicken isn’t just cooked; it’s encased in a seasoned, crispy panko-Parmesan crust that shatters with every bite. The dressing isn’t from a bottle; it’s a vibrant, balanced blend of creamy mayo, tangy Greek yogurt, fresh lemon, and real Parmesan that comes together in minutes. This isn’t just a recipe; it’s a blueprint for creating a sandwich experience that rivals your favorite cafe. It’s a hearty, satisfying meal perfect for a weekend lunch, a casual weeknight dinner, or anytime you’re craving something that truly hits the spot.
Ingredients for the Perfect Chicken Caesar Sandwich
The magic of a truly great Chicken Caesar Sandwich lies in its components. While it might look like a long list, we’re essentially building three distinct parts: a killer homemade Caesar dressing, unbelievably crispy chicken cutlets, and the final sandwich assembly. Using fresh, quality ingredients will make a world of difference here. For instance, freshly grated Parmesan cheese has a nutty, salty flavor that pre-shredded varieties just can’t match. It melts beautifully into the breading for the chicken and gives the dressing its signature taste. Similarly, using full-fat mayonnaise and Greek yogurt creates a luxuriously creamy base for the dressing that low-fat versions can’t replicate. Each ingredient is chosen to build layers of flavor and texture, coming together for that perfect final bite. Don’t be intimidated; think of it as three simple mini-recipes that unite to create something spectacular.
For the Creamy Caesar Dressing
- ½ cup full-fat mayonnaise
- 3 tbsp Greek yogurt
- 1 tsp Dijon mustard
- 1 tsp Worcestershire sauce
- 2 tbsp lemon juice, freshly squeezed
- ¼ cup Parmesan cheese, freshly grated
- 1-2 garlic cloves, minced
- ¼ tsp black pepper, freshly ground
- Pinch of sea salt
For the Crispy Chicken Cutlets
- 5 chicken cutlets (thinly sliced chicken breasts)
- Sea salt and ground black pepper, to taste
- Oil for frying (like canola, vegetable, or avocado oil)
- ⅓ cup all-purpose flour
- ½ tsp salt
- ¾ tsp smoked paprika
- 2 large eggs
- ¼ tsp salt
- ¾ cup panko crumbs
- ¼ cup plain breadcrumbs
- 1 tsp dried parsley
- ½ tsp ground black pepper
- ½ tsp sea salt
- ½ tsp dried oregano
- 1 tsp garlic powder
- ¼ cup Parmesan cheese, freshly grated
For Assembly
- 2 romaine hearts, chopped and washed
- 1-2 French baguettes
- Extra Parmesan cheese for sprinkling
Why use both panko and regular breadcrumbs?
Panko crumbs provide a light, airy, and exceptionally crispy texture, while fine breadcrumbs help create a more complete, sealed crust on the chicken. The combination gives you the best of both worlds: an audible crunch with a golden-brown coating that adheres perfectly to the cutlet.
Step-by-Step Instructions
Making this incredible sandwich is a process, but a rewarding one. We’ll start by whipping up that delicious Caesar dressing, which allows the flavors to meld while we focus on the chicken. The key to crispy, juicy chicken is a well-organized breading station and properly heated oil. Don’t rush the frying process; giving each cutlet enough space in the pan ensures it cooks evenly and develops that coveted golden-brown crust. Once the chicken is cooked and resting, the rest is just simple assembly. Following these steps will guide you through creating a restaurant-worthy Chicken Caesar Sandwich right at home. It’s all about the method, and this method is foolproof. Get your ingredients ready, and let’s build something delicious together.
- First, prepare the Caesar dressing. In a medium bowl, whisk together the mayonnaise, Greek yogurt, Dijon mustard, Worcestershire sauce, lemon juice, grated Parmesan, minced garlic, pepper, and a pinch of salt. Taste and adjust seasoning if needed. Set aside in the refrigerator.
- Lay the chicken cutlets on a cutting board. If they are uneven, cover them with plastic wrap and gently pound the thicker parts with a meat mallet or rolling pin until they are an even thickness. This ensures they cook evenly. Pat them dry and sprinkle both sides with salt and pepper.
- Set up your breading station with three shallow dishes. In the first, whisk together the flour, ½ tsp salt, and smoked paprika. In the second, beat the eggs with ¼ tsp salt. In the third, combine the panko crumbs, plain breadcrumbs, dried parsley, ½ tsp black pepper, ½ tsp sea salt, dried oregano, garlic powder, and ¼ cup of grated Parmesan.
- Pour about an inch of oil into a large, heavy-bottomed skillet and heat over medium heat. While it heats, bread the chicken. Take one cutlet, dredge it in the flour mixture, ensuring it’s fully coated, and shake off the excess. Dip it into the egg wash, letting any excess drip off. Finally, press it firmly into the panko mixture, covering both sides completely. Set aside on a clean plate and repeat with the remaining cutlets.
- Check if the oil is ready by dropping a panko crumb in; if it sizzles actively, you’re good to go. Carefully place 2-3 breaded cutlets in the pan, being sure not to overcrowd it. Fry for about 4-5 minutes per side, until golden brown, crispy, and cooked through. Remove the chicken and place it on a wire rack to drain.
- To assemble your amazing Chicken Caesar Sandwich, slice the baguettes into sandwich-sized portions (about 5-6 inches) and cut them open. In a large bowl, toss the chopped romaine with about half of the Caesar dressing until lightly coated. Spread a generous layer of the remaining dressing on both sides of the baguette. Place a crispy chicken cutlet on the bottom half, top with a big pile of the dressed romaine, and sprinkle with extra Parmesan. Place the top of the baguette on, and serve immediately.
What is the best way to know when the chicken is done?
While the 4-5 minute per side guideline is reliable, the most accurate way to check for doneness is with an instant-read thermometer. The internal temperature of the chicken should reach 165°F (74°C) at its thickest point. This guarantees it’s cooked through and safe to eat without being overcooked and dry.
Tips & Tricks for the Best Chicken Caesar Sandwich
After making this sandwich countless times, I’ve picked up a few little secrets that take it from great to absolutely unforgettable. These aren’t complicated steps, but small details that make a huge difference in the final texture and flavor. For example, the choice of bread is more important than you might think. A flimsy roll will get soggy and fall apart, turning your masterpiece into a mess. You need a sturdy, crusty bread that can stand up to the creamy dressing and the mountain of toppings. Similarly, how you handle the chicken after frying is crucial for maintaining that perfect crunch you worked so hard to create. These tips are all about maximizing the delicious potential of your Chicken Caesar Sandwich and ensuring every bite is as good as the last. Think of this as the advice a friend would give you over the phone while you’re cooking.
Toast the Baguette for Extra Flavor and Structure
Don’t just slice the baguette open and call it a day. Take a moment to toast it! You can do this in a toaster oven, under the broiler, or even on a grill pan. For a next-level move, brush the cut sides with a little olive oil or melted butter mixed with a pinch of garlic powder before toasting. This not only adds a layer of flavor but also creates a slight barrier that helps prevent the dressing from making the bread soggy too quickly. It gives the sandwich a better structure and a more satisfying, slightly warm crunch when you bite into it.
Don’t Skip the Wire Rack
When your beautiful, golden-brown chicken cutlets come out of the frying pan, resist the urge to place them on a plate lined with paper towels. While paper towels absorb some grease, they also trap steam, which will immediately start to soften that crispy crust you just perfected. Always place fried foods on a wire rack. This allows air to circulate all around the chicken, wicking away steam and excess oil, ensuring the coating stays incredibly crispy until you’re ready to build your Chicken Caesar Sandwich.
Can I make the chicken cutlets ahead of time?
Yes, you can. For the best results, you can bread the chicken cutlets a few hours ahead of time and store them in a single layer in the refrigerator. You can also fry them ahead of time, let them cool completely on a wire rack, and store them in the fridge. To reheat and bring back the crispiness, place them on a baking sheet in a 400°F (200°C) oven for about 10-15 minutes.
Substitutions & Variations
One of the best things about a recipe like this is how easily it can be adapted to your tastes or what you happen to have on hand. While the classic crispy Chicken Caesar Sandwich is a star in its own right, don’t be afraid to play around with it. Maybe you’re looking for a lighter option, or perhaps you want to add even more bold flavors. This recipe is a fantastic starting point for creativity. You can swap out the protein, add extra toppings, or try a different kind of bread to completely change the experience. Below are a few tested and loved variations that work beautifully, whether you need to accommodate a dietary preference or you’re just in the mood for something a little different. Each one keeps the spirit of the original while adding a unique twist.
- Grilled Chicken Caesar Sandwich: For a lighter, smokier flavor, skip the breading and frying. Season chicken breasts with salt, pepper, garlic powder, and olive oil, then grill until cooked through. Let it rest, then slice it and layer it onto your sandwich.
- Spicy Variation: Add a kick to your sandwich by mixing a teaspoon of your favorite hot sauce or a pinch of cayenne pepper into the Caesar dressing. You could also add a pinch of cayenne to the flour mixture for the chicken breading.
- Add Bacon and Avocado: Everything is better with bacon and avocado, right? Add a few slices of crispy, cooked bacon and some creamy avocado slices for extra richness and flavor.
- Different Breads: While a French baguette is classic, this sandwich is also fantastic on toasted ciabatta rolls, a sturdy sourdough, or even a brioche bun for a slightly softer, richer bite.
- Cheese Please: For an extra-gooey, indulgent version, lay a slice of provolone or mozzarella cheese on the chicken cutlet right after it comes out of the pan, allowing it to melt slightly before assembling the sandwich.
Can I make this gluten-free?
Absolutely. To make the crispy chicken gluten-free, simply substitute the all-purpose flour with a gluten-free all-purpose blend and use gluten-free panko and breadcrumbs. Also, ensure your Worcestershire sauce is gluten-free, as some brands contain malt vinegar. Serve it on your favorite gluten-free bread or roll.
Frequently Asked Questions
Can I use store-bought Caesar dressing?
Of course! While the homemade dressing is truly special and comes together quickly, you can absolutely use your favorite store-bought Caesar dressing to save time. Look for a good quality, creamy-style dressing from the refrigerated section of your grocery store for the best flavor.
How do I store leftovers?
It’s best to store the components separately to prevent the sandwich from becoming soggy. Keep the cooked chicken cutlets in an airtight container in the refrigerator for up to 3 days. The Caesar dressing can be stored in a separate airtight container in the fridge for up to a week. The chopped romaine should also be kept separately. When you’re ready for another sandwich, simply reheat the chicken and assemble.
Can I bake or air fry the chicken instead?
Yes, for a healthier alternative to pan-frying. To bake, preheat your oven to 400°F (200°C). Place the breaded cutlets on a wire rack set on a baking sheet and spray them generously with cooking oil. Bake for 20-25 minutes, flipping halfway through, until golden and cooked through. For an air fryer, preheat to 375°F (190°C), spray the basket and the chicken with oil, and cook for 15-20 minutes, flipping halfway, until crispy.
Conclusion
There you have it – everything you need to create what I confidently call the ultimate Chicken Caesar Sandwich. From the rich and tangy homemade dressing to the audibly crispy, juicy chicken, this is so much more than just a way to use up leftover salad. It’s a project that’s well worth the effort, delivering a satisfying, flavor-packed meal that feels both comforting and a little bit fancy. The combination of textures and temperatures – the warm, crunchy chicken against the cool, crisp lettuce – is what makes it so irresistible. I truly hope you give this recipe a try and that it brings a little bit of joy to your lunch or dinner table. It has become a staple in my home, and I’m sure it will be in yours too.
Chicken Caesar Sandwich
Ingredients
Equipment
Method
- First, prepare the Caesar dressing. In a medium bowl, whisk together the mayonnaise, Greek yogurt, Dijon mustard, Worcestershire sauce, lemon juice, grated Parmesan, minced garlic, pepper, and a pinch of salt. Taste and adjust seasoning if needed. Set aside in the refrigerator.
- Lay the chicken cutlets on a cutting board. If they are uneven, cover them with plastic wrap and gently pound the thicker parts with a meat mallet or rolling pin until they are an even thickness. This ensures they cook evenly. Pat them dry and sprinkle both sides with salt and pepper.
- Set up your breading station with three shallow dishes. In the first, whisk together the flour, ½ tsp salt, and smoked paprika. In the second, beat the eggs with ¼ tsp salt. In the third, combine the panko crumbs, plain breadcrumbs, dried parsley, ½ tsp black pepper, ½ tsp sea salt, dried oregano, garlic powder, and ¼ cup of grated Parmesan.
- Pour about an inch of oil into a large, heavy-bottomed skillet and heat over medium heat. While it heats, bread the chicken. Take one cutlet, dredge it in the flour mixture, ensuring it’s fully coated, and shake off the excess. Dip it into the egg wash, letting any excess drip off. Finally, press it firmly into the panko mixture, covering both sides completely. Set aside on a clean plate and repeat with the remaining cutlets.
- Check if the oil is ready by dropping a panko crumb in; if it sizzles actively, you’re good to go. Carefully place 2-3 breaded cutlets in the pan, being sure not to overcrowd it. Fry for about 4-5 minutes per side, until golden brown, crispy, and cooked through. Remove the chicken and place it on a wire rack to drain.
- To assemble your amazing Chicken Caesar Sandwich, slice the baguettes into sandwich-sized portions (about 5-6 inches) and cut them open. In a large bowl, toss the chopped romaine with about half of the Caesar dressing until lightly coated. Spread a generous layer of the remaining dressing on both sides of the baguette. Place a crispy chicken cutlet on the bottom half, top with a big pile of the dressed romaine, and sprinkle with extra Parmesan. Place the top of the baguette on, and serve immediately.