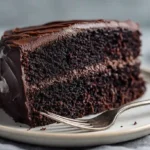
I’ll never forget the afternoon I discovered Biscoff spread at my local grocery store. I’d always loved those crispy caramelized cookies that come with coffee, but the idea of a spreadable version? Mind. Blown. Within days, I was experimenting with ways to transform that distinctive speculoos flavor into something even more decadent. That’s when these mini Biscoff cheesecakes were born—a glorious fusion of buttery cookie crust and silky cream cheese Biscoff filling that’s become my most-requested dessert.
These small cheesecake cups are pure magic for anyone who loves easy desserts cheesecake style but doesn’t want to wrestle with springform pans and water baths. The best part? They’re completely no-bake, which means you can create bakery-quality cream cheese sweets recipes without turning on your oven. Whether you’re planning holiday dessert recipes Christmas gatherings, hosting a baby shower, or simply treating yourself to something special, these individual portions deliver maximum flavor with minimal effort.
Table of Contents
Why You’ll Love These Mini Biscoff Cheesecakes
- No-bake convenience: Skip the oven completely and let your refrigerator work its magic while you relax
- Perfect portion control: Individual servings mean no messy slicing and everyone gets their own beautifully presented dessert
- Make-ahead friendly: Prepare these seasonal dessert ideas up to two days in advance, making party prep absolutely stress-free
- Cookie butter heaven: The distinctive caramelized spice flavor of Biscoff creates an unforgettable taste experience in every bite
- Endlessly customizable: Dress them up fancy or keep them simple—either way, they’re absolutely delicious
- Beginner-approved: Even if you’ve never attempted cheesecake before, you’ll nail this recipe on your very first try
- Bakery-worthy presentation: These mini beauties look like they came from an expensive dessert shop but require surprisingly little effort
- Crowd-pleaser guarantee: I’ve yet to serve these without someone asking for the recipe
Ingredients for Mini Biscoff Cheesecakes
One of the brilliant aspects of these cream cheese sweets recipes is how straightforward the ingredient list is. You won’t need any specialty items—just quality basics that combine to create something extraordinary.
- Biscoff cookie crumbs – Finely crushed Biscoff cookies (Lotus Biscoff biscuits). Be sure the crumbs are very fine.
- Granulated sugar – Just a touch to enhance sweetness
- Salted butter – Melted, to bind the crust together
- Cream cheese – Full fat cream cheese, room temperature. This is crucial!
- Powdered sugar – Confectioners’ sugar/icing sugar for smooth texture
- Biscoff spread – Use your favorite cookie butter. My favorite is Biscoff cookie butter spread.
- Vanilla extract – Pure vanilla extract for the cheesecake filling and whipped cream
- Heavy cream – Heavy cream is used for the cheesecake filling and to make whipped cream topping
- Biscoff cookies – Use pieces of Biscoff cookies to decorate the cheesecakes. They are also known as Speculoos cookies
Pro Ingredient Tips:
- Always use full-fat cream cheese—reduced-fat versions contain more water and won’t set properly for these no bake cheesecake cookies
- Room temperature cream cheese is absolutely crucial; cold cream cheese will create lumps that are nearly impossible to eliminate
- If you can’t find Biscoff spread, you can use other speculoos cookie butter brands, though the flavor profile may vary slightly
- Fresh heavy cream whips better than cream approaching its expiration date
- Don’t skip the vanilla—it enhances all the other flavors beautifully
How to Make Mini Biscoff Cheesecakes
Follow these straightforward steps to create the most delicious easy desserts cheesecake style that everyone will rave about.
Step 1: Create Your Biscoff Cookie Crust
Begin by processing your Biscoff cookies in a food processor until they transform into fine crumbs—they should resemble wet sand in texture. You’ll need approximately 2 cups of cookie crumbs, which typically equals one standard package of Biscoff cookies. Transfer the crumbs to a medium bowl and stir in 2 tablespoons of granulated sugar.
Pour 6 tablespoons of melted butter over the cookie mixture and stir thoroughly with a fork until all the crumbs are evenly moistened. The mixture should clump together when pressed between your fingers. Using a small cookie scoop (about 1 tablespoon), portion the crumb mixture into your prepared mini cheesecake pans. Press down firmly using the back of a spoon, a small glass, or a tart tamper to create a compact, even crust base. Set aside while you prepare the luscious filling.
Step 2: Prepare the Dreamy Cheesecake Filling
In a large mixing bowl, combine 16 ounces of room-temperature cream cheese, 1¾ cups of powdered sugar, 1 cup of Biscoff spread, and 2 teaspoons of vanilla extract. Beat with an electric mixer on medium speed for 2-3 minutes until the mixture becomes completely smooth and creamy with absolutely no lumps remaining. Take your time with this step—scrape down the sides of the bowl as needed to ensure everything is perfectly incorporated.
Pour in 1 cup of cold heavy whipping cream and continue beating on medium-high speed for another 2-3 minutes. Watch carefully as the mixture gradually thickens and transforms into something light and fluffy, similar to mousse. You’re looking for soft peaks that hold their shape but aren’t overly stiff. This aeration is what gives these small cheesecake cups their perfect, cloud-like texture.
Step 3: Fill and Chill Your Mini Cheesecakes
Transfer your cheesecake filling to a piping bag or a large zip-top bag with one corner snipped off. Pipe the filling onto each prepared crust, filling just slightly above the rim of each cup since the filling will settle as it chills. If you don’t have a piping bag, you can carefully spoon the filling into each cup, though piping gives the cleanest, most professional appearance.
Cover the pan lightly with plastic wrap, making sure it doesn’t touch the surface of the cheesecakes. Refrigerate for at least 12 hours or overnight. This extended chilling time is essential for the filling to set properly and for the flavors to develop fully. This makes them perfect holiday dessert recipes Christmas planning since you can make them the day before your celebration.
Step 4: Add Beautiful Finishing Touches
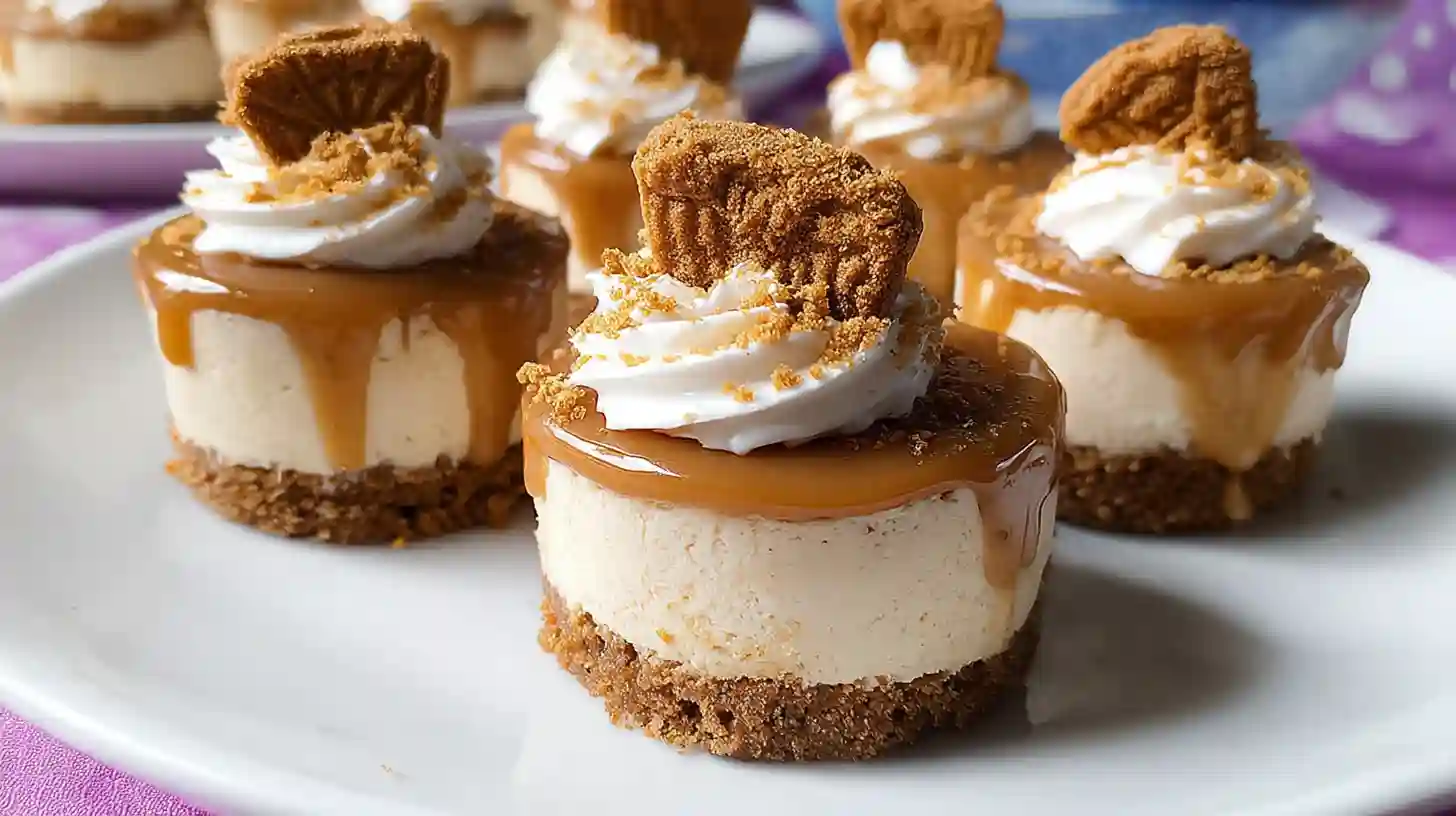
Once your cheesecakes are fully set, gently remove them from the pans by pressing up on the removable bottoms. If using a muffin tin with liners, simply peel away the paper carefully. Arrange your mini cheesecakes on a beautiful serving platter.
Heat ¾ cup of Biscoff spread in the microwave for 20-30 seconds until it’s slightly melted and perfectly pourable. Drizzle or spoon a generous amount over each cheesecake. If you’re making fresh whipped cream, beat ¾ cup of heavy cream with 2 tablespoons of powdered sugar and ½ teaspoon of vanilla until stiff peaks form. Pipe or dollop whipped cream on top of each cheesecake.
For the final flourish, sprinkle with Biscoff cookie crumbs and top each with half of a Biscoff cookie pressed gently into the whipped cream. The result? Bakery-worthy Biscoff cookie cheesecake bars in adorable individual portions that look absolutely stunning!

Recipe Tips
- Use a food processor to make the Biscoff cookie crumbs. You could also place the cookies in a resealable storage bag and crush them with a rolling pin
- Use a small cookie scoop to portion the Biscoff cookie crumbs into the mini cheesecake pan. This is equivalent to about 1 tablespoon. Press the crumbs down with a spoon, shot glass, or muddler
- Room temperature cream cheese is non-negotiable—set it out 2-3 hours before making your filling
- Don’t overbeat once you add the heavy cream—mix just until soft peaks form
- Patience with chilling time makes all the difference in texture
- Add toppings just before serving for the freshest presentation
Creative Variations and Customizations
One reason these mini cheesecakes are perfect seasonal dessert ideas is how easily you can adapt them:
Flavor Twists:
- Chocolate lover’s version: Add 3 tablespoons of cocoa powder to the filling and drizzle with melted chocolate
- Caramel Biscoff: Replace half the Biscoff spread with dulce de leche for deeper caramel notes
- Espresso enhancement: Add 1 tablespoon of instant espresso powder for a sophisticated coffee flavor
- Cinnamon spice: Mix ½ teaspoon of cinnamon into your crust for extra warmth
Topping Ideas:
- Crushed pretzels for a sweet-salty combination
- Chopped pecans or walnuts for added crunch
- Fresh berries for a lighter, elegant presentation
- Caramel sauce instead of cookie butter drizzle
- Mini chocolate chips sprinkled on top
- A dusting of cinnamon or cocoa powder
How to Store Mini Biscoff Cheesecakes
Proper storage ensures your cream cheese sweets recipes stay fresh and delicious:
Refrigerator Storage:
Store your mini cheesecakes in an airtight container in the refrigerator for up to 5 days. If you’ve already added the toppings, they’ll stay fresh for about 3 days. For best results, store the cheesecakes without toppings and add the cookie butter drizzle, whipped cream, and cookie garnish just before serving.
Freezer Storage:
These easy desserts cheesecake treats freeze beautifully! Freeze the cheesecakes without any toppings for up to 2 months. Wrap each individual cheesecake in plastic wrap, then place them all in a freezer-safe container or zip-top bag. To serve, thaw in the refrigerator overnight and add your toppings fresh.
Frequently Asked Questions
How should I store the mini cheesecakes?
- Store the mini cheesecakes in an airtight container in the refrigerator for about 3 days. Serve chilled.
How do I get the cheesecakes out of the pan?
- Mini cheesecake pans have removable bottoms. When the cheesecakes are set, you simply press up on the bottom of the pan to pop them out.
- I recommend inserting a toothpick into the top of the cheesecake as you press up on the mini cheesecake pan’s removable bottom. It will be covered by the cookie butter and whipped cream, so you won’t see the hole.
What should I do if I don’t have a mini cheesecake pan?
- If you do not have a mini cheesecake pan, you can use a cupcake or muffin pan. If you are using a standard cupcake pan, the yield of the recipe will be about 12 to 14 mini cheesecakes. Use cupcake liners for easy removal.
Can I freeze the cheesecakes?
- Yes! You can! Store them in an airtight container in the freezer for one month.
- I recommend waiting to add the cookie butter, whipped cream, and cookies until after you thaw the cheesecakes for best results.
Other Mini Cheesecake Recipes You Will Love
- Chocolate peanut butter cheesecakes
- Oreo cheesecakes
- Key lime cheesecakes
- Pumpkin spice cheesecakes
Mini Biscoff Cheesecakes Recipe
Ingredients
Method
- Make the Biscoff cookie crust: In a food processor, pulse Biscoff cookies until they become fine crumbs. Transfer 2 cups of crumbs to a mixing bowl and stir in 2 tablespoons granulated sugar. Pour in the melted butter and mix with a fork until all crumbs are evenly moistened and the mixture holds together when pressed. Using a small cookie scoop (about 1 tablespoon), portion the crumb mixture into mini cheesecake pans. Firmly press the crumbs into the bottom of each cup using the back of a spoon or small glass to form a compact crust. Set aside.
- Prepare the Biscoff cheesecake filling: In a large mixing bowl, combine room temperature cream cheese, 1¾ cups powdered sugar, 1 cup Biscoff spread, and 2 teaspoons vanilla extract. Using an electric hand mixer, beat on medium speed for 2-3 minutes until completely smooth and creamy with no lumps. Scrape down the sides of the bowl as needed to ensure everything is well incorporated.
- Add the cream and whip: Pour 1 cup of cold heavy cream into the cream cheese mixture. Continue beating on medium-high speed for 2-3 minutes until the mixture thickens and becomes light and fluffy, similar to mousse. You’re looking for soft peaks that hold their shape. Don’t overbeat or the mixture may become grainy.
- Fill the mini cheesecakes: Transfer the cheesecake filling to a piping bag or large zip-top bag with one corner snipped off. Pipe the filling onto each prepared crust, filling slightly above the rim of each cup as the filling will settle during chilling. If you don’t have a piping bag, carefully spoon the filling into each cup.
- Chill the cheesecakes: Cover the pan lightly with plastic wrap, ensuring it doesn’t touch the surface of the cheesecakes. Refrigerate for at least 12 hours or overnight. This extended chilling time is essential for the filling to set properly and for flavors to develop fully. After chilling, gently remove the cheesecakes from the pans by pressing up on the removable bottoms.
- Make the whipped cream: In a clean mixing bowl with an electric mixer, whip ¾ cup heavy cream, 2 tablespoons powdered sugar, and ½ teaspoon vanilla extract on medium-high speed until medium-stiff peaks form, about 2-3 minutes. Transfer to a piping bag fitted with a Wilton 1M piping tip.
- Assemble and decorate: Heat the additional ¾ cup Biscoff spread in the microwave for 20-30 seconds until slightly melted and pourable. Drizzle or spoon the melted Biscoff spread over the top of each chilled cheesecake. Pipe a swirl of whipped cream on top of each cheesecake using the 1M tip. Sprinkle with Biscoff cookie crumbs and top each with half of a Biscoff cookie pressed gently into the whipped cream. Serve immediately or refrigerate until ready to serve.
Notes
- Storage: Store mini cheesecakes in an airtight container in the refrigerator for up to 5 days. For best presentation, add toppings just before serving.
- Freezing: Freeze unfrosted cheesecakes for up to 2 months. Wrap individually in plastic wrap, then place in a freezer-safe container. Thaw overnight in the refrigerator before adding toppings.
- Room temperature cream cheese: This is crucial for a smooth, lump-free filling. Set cream cheese out 2-3 hours before starting.
- Without mini cheesecake pans: Use a standard 12-cup muffin tin with cupcake liners. This will yield 12-14 larger mini cheesecakes.
- Cookie crumbs: If you don’t have a food processor, place cookies in a zip-top bag and crush with a rolling pin until very fine.
- Make-ahead tip: These are perfect for parties! Make the cheesecakes 1-2 days ahead and add toppings 2-4 hours before serving.