There are some desserts that are just showstoppers, and this Red Velvet Strawberry Cheesecake is truly one of them. I remember the first time I made it for a family birthday party. The vibrant red against the creamy white, topped with glistening strawberries, made everyone gasp a little when I brought it to the table. It’s more than just a cake; it’s a centerpiece, a conversation starter, and the sweet reward at the end of a celebration. This isn’t just another red velvet cheesecake recipe; it’s an experience that combines the tangy, subtle chocolate flavor of a perfect red velvet cake with the rich, decadent smoothness of a classic New York-style cheesecake.
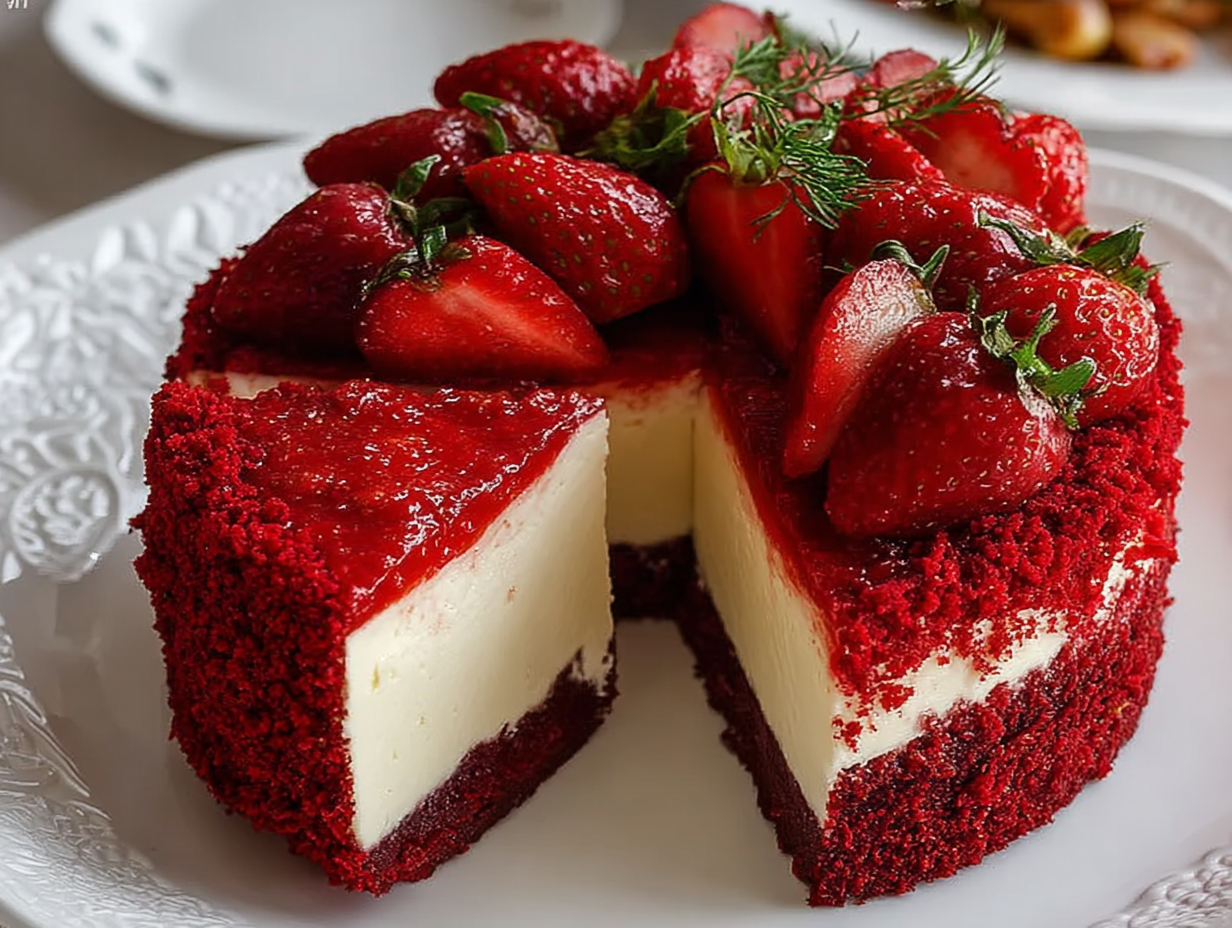
What makes this recipe so special is the balance. The red velvet base isn’t just a colored sponge; it has that signature buttermilk tang and a hint of cocoa that makes red velvet so beloved. It provides the perfect foundation for the star of the show: the impossibly creamy cheesecake layer. We then finish it all off with a simple, fresh strawberry topping that cuts through the richness and adds a bright, fruity note. It looks like it came from a high-end bakery, but it’s surprisingly straightforward to make in your own kitchen. Whether you’re looking for the best cheesecake recipe to impress your friends or a memorable dessert for a holiday, this is the one you’ll come back to again and again.
Ingredients for Red Velvet Strawberry Cheesecake
This recipe breaks down into three simple components: the red velvet cake base, the creamy cheesecake filling, and the fresh strawberry topping. Having your ingredients pre-measured and at the right temperature (especially the dairy and eggs!) is the secret to a flawless cheesecake. Here’s exactly what you’ll need.
For the Red Velvet Cake Base:
- 1 ½ cups all-purpose flour
- 1 cup granulated sugar
- 1 tablespoon cocoa powder
- 1 teaspoon baking powder
- ½ teaspoon salt
- ½ cup unsalted butter, softened
- 2 large eggs
- 1 teaspoon vanilla extract
- 1 tablespoon red food coloring
- ½ cup buttermilk
- 1 teaspoon white vinegar
For the Cheesecake Layer:
- 3 packages (8 oz each) cream cheese, softened
- 1 cup granulated sugar
- 3 large eggs
- 1 teaspoon vanilla extract
- ⅓ cup sour cream
- 2 tablespoons all-purpose flour
For the Strawberry Topping:
- 2 cups fresh strawberries, hulled and sliced
- ¼ cup granulated sugar
- 1 tablespoon lemon juice
Step-by-Step Instructions
Let’s walk through making this gorgeous Red Velvet Strawberry Cheesecake together. Don’t be intimidated by the layers; we’ll take it one step at a time. The key is to work gently, especially with the cheesecake batter, to keep it dense and creamy. Follow these steps closely for a perfect result.
- Preheat your oven to 350°F (175°C). Carefully grease a 9-inch springform pan and line the bottom with a circle of parchment paper. This is a lifesaver for easy removal later.
- In a large mixing bowl, whisk together the flour, sugar, cocoa powder, baking powder, and salt for the red velvet base. Getting rid of any lumps now is key.
- Add the softened butter to your dry ingredients. Mix on low speed (or with a pastry cutter) until the texture looks like coarse, sandy crumbs.
- In a separate, medium-sized bowl, whisk the eggs, vanilla extract, red food coloring, buttermilk, and white vinegar until they are uniformly combined. This is your wet mixture.
- Gently pour the wet mixture into the dry ingredients. Mix on low speed until everything is just combined. Be careful not to overmix, as that can make the cake tough.
- Pour the vibrant red velvet batter into your prepared springform pan and use a spatula to spread it into an even layer. This forms the foundation of your cheesecake.
- Now, for the cheesecake layer. In a large bowl, beat the softened cream cheese with an electric mixer until it’s completely smooth and free of lumps. This step is crucial for a creamy texture.
- Gradually add the granulated sugar to the cream cheese, beating until the mixture is smooth and creamy. Scrape down the sides of the bowl as needed.
- Add the eggs one at a time, mixing on low speed after each one just until the yolk disappears. Overbeating after adding eggs can incorporate too much air, leading to cracks. Stir in the vanilla extract, sour cream, and flour until just smooth.
- Gently pour the finished cheesecake batter over the red velvet layer in the pan. Spread it evenly.
- Bake for 50-60 minutes. You’ll know it’s done when the edges are set, but the center still has a slight jiggle to it. Don’t overbake!
- Turn off the oven and let the cheesecake cool inside with the door cracked open for about an hour. Then, let it cool completely at room temperature before moving it to the refrigerator. Chill for at least 4 hours, but overnight is even better for the best flavor and texture.
- To make the strawberry topping, combine the sliced strawberries, sugar, and lemon juice in a small saucepan over medium heat.
- Cook, stirring occasionally, until the strawberries have softened and released their juices, and the sauce has thickened slightly (about 5-7 minutes).
- Allow the strawberry topping to cool completely. Once cooled, spread it over your chilled cheesecake before serving.
- To serve, run a thin knife around the edge of the pan before releasing the springform clasp. Transfer to a serving platter and enjoy!
Tips for the Perfect Red Velvet Strawberry Cheesecake
Making a cheesecake from scratch can feel like a major culinary project, but a few simple tricks can make all the difference between a good cheesecake and a great one. The most common fear is the dreaded crack across the top. But don’t worry, we can avoid that. The secret to a perfect, creamy, and crack-free homemade cheesecake lies in temperature and technique. First and foremost, ensure your cream cheese, eggs, and sour cream are all at room temperature. This isn’t just a suggestion; it’s essential. Cold ingredients don’t blend smoothly, leading to a lumpy batter. Over-mixing to get rid of those lumps incorporates too much air, which causes the cheesecake to puff up in the oven and then crack as it cools.
Another game-changing tip is to use a water bath, or a bain-marie. While this recipe doesn’t explicitly call for one, it’s the professional secret to an evenly baked cheesecake with a moist, humid environment. To do this, wrap the outside of your springform pan in a double layer of heavy-duty aluminum foil. Place it in a larger roasting pan, and pour hot water into the roasting pan until it comes about halfway up the sides of your cheesecake pan. This gentle, even heat prevents the cheesecake from baking too quickly and cracking. Finally, be patient with the cooling process. Abrupt temperature changes are the enemy. The gradual cooling method outlined in the instructions—letting it rest in the turned-off oven, then on the counter, then in the fridge—is your best defense against a cracked surface. Following these tips will give you a flawless Red Velvet Strawberry Cheesecake every time.
Why did my cheesecake crack?
Cheesecake cracks are usually caused by one of three things: over-mixing (especially after adding eggs), over-baking, or cooling too quickly. To avoid this, mix on low speed, bake just until the center is slightly jiggly, and follow the slow cooling process. A water bath is also an excellent preventative measure.
Substitutions and Variations
While this Red Velvet Strawberry Cheesecake recipe is a classic, there are plenty of ways to customize it to your liking or adapt it based on the ingredients you have on hand. The beauty of a recipe like this is its versatility. For the topping, while fresh strawberries are fantastic, you’re not limited to them. A raspberry or cherry topping would be equally delicious and would complement the red velvet beautifully. You could even use a mix of berries for a different flavor profile. In the winter, when fresh berries aren’t at their best, a high-quality fruit preserve or even a rich chocolate ganache would be a decadent alternative.
If you’re not a fan of the red velvet cake base, you can easily substitute it. A classic graham cracker crust or a chocolate cookie crust would work wonderfully. Simply crush about 1 ½ cups of cookies or crackers, mix with 6 tablespoons of melted butter, and press firmly into the bottom of the pan before adding the cheesecake filling. For a flavor twist within the cheesecake itself, consider adding a teaspoon of almond extract along with the vanilla or folding in a half cup of mini chocolate chips into the batter before baking. These small changes can add a personal touch to your creation, making the recipe truly your own.
Can I make this recipe gluten-free?
Yes, you can adapt this recipe to be gluten-free. For the red velvet cake base, simply substitute the all-purpose flour with a high-quality, cup-for-cup gluten-free baking flour blend. For the cheesecake layer, replace the two tablespoons of all-purpose flour with one tablespoon of cornstarch to help prevent cracking. The rest of the ingredients are naturally gluten-free, but always double-check your labels for things like cocoa powder and food coloring to be safe.
Frequently Asked Questions
How far in advance can I make this Red Velvet Strawberry Cheesecake?
This is the perfect make-ahead dessert! You can bake the cheesecake 1-2 days in advance. In fact, the flavor and texture are often better on the second day. Keep it covered in the refrigerator and wait to add the fresh strawberry topping until you’re ready to serve to keep it from making the top of the cheesecake soggy.
What is the best way to store leftovers?
Store any leftover cheesecake tightly covered with plastic wrap or in an airtight container in the refrigerator. It will stay fresh and delicious for up to 4-5 days.
Can I use frozen strawberries for the topping?
Absolutely. If fresh strawberries are out of season, frozen ones work perfectly well for the cooked topping. You don’t even need to thaw them first. Just put them in the saucepan and you may need to cook them for a few extra minutes to allow them to break down and the sauce to thicken.
Why do you use both vinegar and buttermilk in the red velvet cake?
This is a classic combination for red velvet cake. The acidity in both the buttermilk and the vinegar reacts with the baking powder to give the cake a tender, soft crumb. It also enhances the subtle tang that is characteristic of a traditional red velvet flavor profile, balancing the sweetness of the cake and cheesecake.
Conclusion
There you have it—a truly show-stopping Red Velvet Strawberry Cheesecake that is guaranteed to be the star of any dessert table. From the moist, tangy red velvet base to the ultra-creamy cheesecake center and the bright, fresh strawberry topping, every single bite is a delight. I hope you feel inspired and confident to bake this incredible dessert. It’s a wonderful project for a weekend and a beautiful way to show some love to your friends and family. Don’t forget to save this best cheesecake recipe for your next special occasion. Happy baking!
Red Velvet Strawberry Cheesecake
Ingredients
Equipment
Method
- Preheat your oven to 350°F (175°C). Carefully grease a 9-inch springform pan and line the bottom with a circle of parchment paper. This is a lifesaver for easy removal later.
- In a large mixing bowl, whisk together the flour, sugar, cocoa powder, baking powder, and salt for the red velvet base. Getting rid of any lumps now is key.
- Add the softened butter to your dry ingredients. Mix on low speed (or with a pastry cutter) until the texture looks like coarse, sandy crumbs.
- In a separate, medium-sized bowl, whisk the eggs, vanilla extract, red food coloring, buttermilk, and white vinegar until they are uniformly combined. This is your wet mixture.
- Gently pour the wet mixture into the dry ingredients. Mix on low speed until everything is just combined. Be careful not to overmix, as that can make the cake tough.
- Pour the vibrant red velvet batter into your prepared springform pan and use a spatula to spread it into an even layer. This forms the foundation of your cheesecake.
- Now, for the cheesecake layer. In a large bowl, beat the softened cream cheese with an electric mixer until it’s completely smooth and free of lumps. This step is crucial for a creamy texture.
- Gradually add the granulated sugar to the cream cheese, beating until the mixture is smooth and creamy. Scrape down the sides of the bowl as needed.
- Add the eggs one at a time, mixing on low speed after each one just until the yolk disappears. Overbeating after adding eggs can incorporate too much air, leading to cracks. Stir in the vanilla extract, sour cream, and flour until just smooth.
- Gently pour the finished cheesecake batter over the red velvet layer in the pan. Spread it evenly.
- Bake for 50-60 minutes. You’ll know it’s done when the edges are set, but the center still has a slight jiggle to it. Don’t overbake!
- Turn off the oven and let the cheesecake cool inside with the door cracked open for about an hour. Then, let it cool completely at room temperature before moving it to the refrigerator. Chill for at least 4 hours, but overnight is even better for the best flavor and texture.
- To make the strawberry topping, combine the sliced strawberries, sugar, and lemon juice in a small saucepan over medium heat.
- Cook, stirring occasionally, until the strawberries have softened and released their juices, and the sauce has thickened slightly (about 5-7 minutes).
- Allow the strawberry topping to cool completely. Once cooled, spread it over your chilled cheesecake before serving.
- To serve, run a thin knife around the edge of the pan before releasing the springform clasp. Transfer to a serving platter and enjoy!