There are some flavor combinations that just feel like a celebration, and for me, that’s exactly what these Crushed Oreo Red Velvet Cookies are. I still remember the first time I pulled a tray of these from the oven. The deep, vibrant red was so striking, and the little bumps of Oreo pieces and white chocolate chips promised something truly special. These aren’t just your average red velvet cookie; they are a full-blown dessert experience, combining the subtle tang of red velvet cake, the creamy sweetness of white chocolate, and the iconic, crunchy goodness of America’s favorite cookie. They are everything you want in a cookie: thick, incredibly chewy, and gooey in the center.
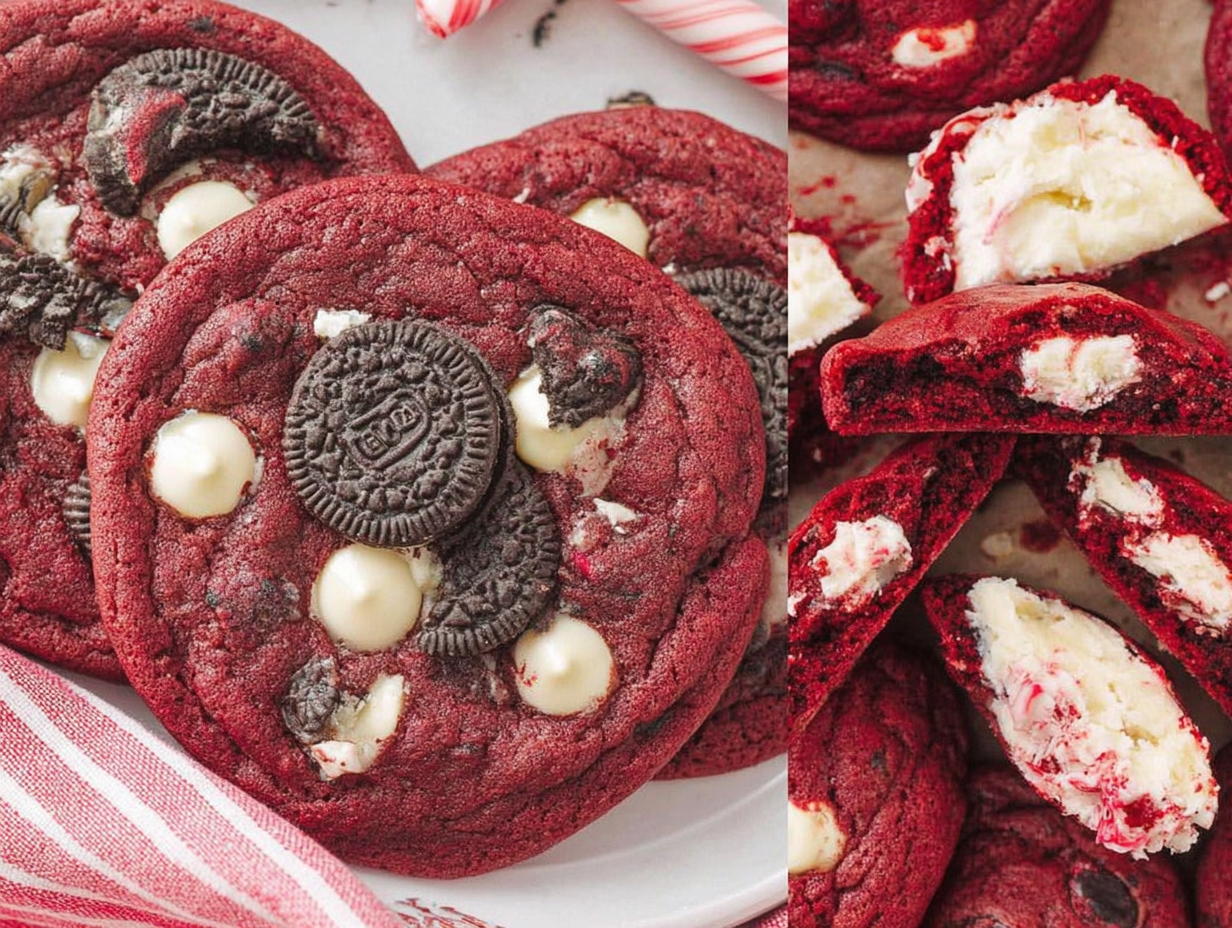
This recipe was born from a desire to create something truly decadent for a Valentine’s Day party, but they’ve since become a year-round staple in my baking rotation. They have the visual appeal of those gorgeous Pinterest cookie recipes heart-shaped treats you see everywhere, but with a flavor that is so much more complex and satisfying. If you love cookies and cream, you will adore these Red Velvet Cookies And Cream Cookies. The dough itself is a dream to work with, and the simple act of chilling it before baking is the secret to getting that perfect, thick texture that doesn’t spread too thin. Every bite is a perfect balance of soft cookie, melted chocolate, and crunchy cookie pieces. Get ready to find your new favorite cookie recipe!
Ingredients for Crushed Oreo Red Velvet Cookies
One of the best things about this recipe is that it uses straightforward pantry staples. There’s nothing too fancy here, just classic ingredients that come together to create something truly magical. The key is in the combination and the ratios. The cocoa powder provides that classic red velvet flavor base, while the two types of sugar ensure a perfectly chewy texture with slightly crisp edges. Make sure your butter is properly softened—not melted!—as this is crucial for the dough’s final consistency. And don’t skimp on the vanilla; a good quality extract makes a world of difference. The real stars, of course, are the white chocolate chips and the crushed Oreos, which get folded in at the end to create pockets of creamy, crunchy goodness in every single bite.
- Flour: 4 cups, all-purpose.
- Cocoa Powder: 1/2 cup, unsweetened.
- Salt: 1 tsp.
- Baking Soda: 2 tsp.
- Salted Butter: 1 1/2 cups, softened to room temperature.
- Granulated Sugar: 3/4 cup.
- Brown Sugar: 1 3/4 cups, packed.
- Eggs: 3 large.
- Vanilla Extract: 2 tsp.
- White Chocolate Chips: 1 1/2 cups.
- Oreos: 22 cookies, coarsely crushed.
- Red Food Coloring: 2 bottles (about 5-6 oz total), liquid is recommended for vibrant color.
Step-by-Step Instructions
Making these Red Oreo Cookies is a straightforward process, but paying attention to a few key details will guarantee perfect results. The most important step that you absolutely cannot skip is chilling the dough. This prevents the cookies from spreading into thin, crispy disks and instead creates the thick, chewy texture we’re aiming for. When you’re crushing the Oreos, aim for a mix of larger chunks and smaller crumbs for the best texture. I usually just place them in a zip-top bag and give them a few good whacks with a rolling pin. Follow these steps calmly, and you’ll be rewarded with the most incredible cookies.
- Prepare Your Dry Ingredients: In a medium bowl, whisk together the flour, cocoa powder, salt, and baking soda. Set this aside for later. This step ensures the leavening agents are evenly distributed.
- Cream Butter and Sugars: In a large bowl using a stand mixer or a hand mixer, beat the softened butter, granulated sugar, and brown sugar together on medium speed until the mixture is light and fluffy, about 2-3 minutes.
- Add Wet Ingredients: Add the eggs one at a time, beating well after each addition. Mix in the vanilla extract and the entire amount of red food coloring until the color is uniform and vibrant.
- Combine Wet and Dry: With the mixer on low speed, gradually add the dry ingredient mixture to the wet ingredients. Mix only until just combined—be careful not to overmix at this stage.
- Fold in the Good Stuff: Gently fold in the white chocolate chips and the crushed Oreos with a spatula. The dough will be thick and wonderfully textured.
- Scoop and Shape: Using a tablespoon or a medium cookie scoop, portion out heaping balls of dough. Roll each one gently between your palms. You should get about 20 cookies.
- Press and Chill (The Important Part!): Place the dough balls on a parchment paper-lined cookie sheet, leaving about 2 inches of space between them. Gently press down on the top of each ball with your fingers to slightly flatten it. Place the entire tray in the fridge to chill for at least 30 minutes.
- Bake: Preheat your oven to 375°F (190°C). Bake the chilled cookies for 12 minutes. The edges should be set, but the center will still look slightly underdone.
- Cool and Enjoy: Let the cookies cool on the baking sheet for a few minutes before transferring them to a wire rack to cool completely. Then, pour a glass of milk and enjoy your delicious Red Velvet Oreo Cookie creations!
Tips & Tricks for Perfect Crushed Oreo Red Velvet Cookies
Over the years, I’ve made countless batches of these Crushed Oreo Red Velvet Cookies, and I’ve learned a few things that really take them from good to unforgettable. The biggest game-changer is the chilling time. I know it’s tempting to skip it, but that 30 minutes in the fridge is what solidifies the butter, preventing the cookies from spreading too much and developing a deeper flavor. Another tip is to not over-crush your Oreos. You want a variety of sizes, from fine crumbs to larger chunks, which adds a wonderful textural surprise to the final cookie. When it comes to baking, trust the process. Pulling them out when the center still looks a little soft is the key to a gooey, chewy middle once they cool.
Getting the Color Just Right
The vibrant red hue is what makes these cookies so visually stunning. While many recipes now call for gel food coloring, I’ve found that old-fashioned liquid red food coloring gives a more classic, brilliant red in this particular recipe, especially when combined with the brown of the cocoa powder. You’ll need a surprising amount to achieve that deep color, so don’t be shy with it. Two standard-sized bottles from the grocery store are usually perfect. If you only have gel, you can certainly use it, but start with a smaller amount (maybe a tablespoon) and add more until you reach your desired shade.
How do I know when the cookies are done?
The visual cue for perfectly baked cookies is key. At the 12-minute mark, the edges should look set and slightly firm, but the center should still appear soft and slightly puffy. They might even look a little underbaked in the very middle. This is exactly what you want. The cookies will continue to cook from the residual heat of the pan as they cool, resulting in that coveted gooey center. If you wait until they look fully cooked in the oven, they will be hard and dry once cooled.
Substitutions & Variations
While the classic Crushed Oreo Red Velvet Cookies recipe is a showstopper, it’s also incredibly versatile. Think of this as a starting point for your own creative cookie adventures. You can easily swap out the mix-ins to suit your taste or what you have on hand. Don’t have white chocolate chips? Milk chocolate, semi-sweet, or even dark chocolate chunks would be fantastic, creating a richer, more intense flavor profile. You can also experiment with different types of Oreos—Golden Oreos would create a lovely vanilla cookies and cream flavor, while mint or peanut butter Oreos could add a fun twist.
- Chocolate Variations: Instead of white chocolate chips, try using semi-sweet chocolate chips, dark chocolate chunks, or even peanut butter chips.
- Holiday Twist: For a festive touch, turn these into Valentines M&M Oreo Cookies by swapping out half of the white chocolate chips for red and pink M&Ms. You could also press a few Chocolate Cookies With Heart-shaped Candy on top right after they come out of the oven.
- Different Oreos: Experiment with different Oreo flavors. Double Stuf will add extra creaminess, while Golden Oreos will give a vanilla-forward flavor.
- No Food Coloring: If you’re not a fan of food coloring, you can omit it entirely. You’ll have delicious chocolate cookies and cream cookies with the same great taste and texture.
Frequently Asked Questions
Can I make the cookie dough in advance?
Absolutely! This dough is perfect for making ahead. You can prepare the dough, cover the bowl tightly with plastic wrap, and refrigerate it for up to 3 days. When you’re ready to bake, just scoop, press, and bake as directed. You may need to add an extra minute to the baking time since the dough will be colder.
Why did my cookies spread out too much?
The most common reason for cookies spreading is the dough not being cold enough. Chilling the dough for at least 30 minutes is crucial. Another culprit could be butter that was too soft or even melted. Your butter should be at room temperature—soft enough to indent with your finger, but not greasy or melty.
How should I store these Red Velvet Cookies And Cream Cookies?
Store the cooled cookies in an airtight container at room temperature. They will stay soft and chewy for up to 4 days. If you want to keep them longer, you can freeze the baked cookies for up to 3 months. Just let them thaw at room temperature before enjoying.
Conclusion
There’s something so rewarding about baking a batch of cookies from scratch, and these Crushed Oreo Red Velvet Cookies are truly a joy to make and share. From the moment you start creaming the butter and sugar to the final, glorious bite of a warm, gooey cookie, the process is pure comfort. The combination of tangy red velvet, sweet white chocolate, and classic cookies and cream is a guaranteed crowd-pleaser. Whether you’re making them for a special occasion like Valentine’s Day or just to brighten up a regular Tuesday, this Red Velvet Oreo Cookie recipe is one you’ll come back to again and again. I hope you love them as much as my family does. Happy baking!
Crushed Oreo Red Velvet Cookies
Ingredients
Equipment
Method
- Prepare Your Dry Ingredients: In a medium bowl, whisk together the flour, cocoa powder, salt, and baking soda. Set this aside for later.
- Cream Butter and Sugars: In a large bowl using a stand mixer or a hand mixer, beat the softened butter, granulated sugar, and brown sugar together on medium speed until the mixture is light and fluffy, about 2-3 minutes.
- Add Wet Ingredients: Add the eggs one at a time, beating well after each addition. Mix in the vanilla extract and the entire amount of red food coloring until the color is uniform and vibrant.
- Combine Wet and Dry: With the mixer on low speed, gradually add the dry ingredient mixture to the wet ingredients. Mix only until just combined—be careful not to overmix.
- Fold in the Good Stuff: Gently fold in the white chocolate chips and the crushed Oreos with a spatula.
- Scoop and Shape: Using a tablespoon or a medium cookie scoop, portion out heaping balls of dough. Roll each one gently between your palms. You should get about 20 cookies.
- Press and Chill: Place the dough balls on a parchment paper-lined cookie sheet, leaving about 2 inches of space between them. Gently press down on the top of each ball to slightly flatten it. Place the entire tray in the fridge to chill for at least 30 minutes.
- Bake: Preheat your oven to 375°F (190°C). Bake the chilled cookies for 12 minutes. The edges should be set, but the center will still look slightly underdone.
- Cool and Enjoy: Let the cookies cool on the baking sheet for a few minutes before transferring them to a wire rack to cool completely.