There are some flavors that just feel like coming home, and for me, that’s always been cookies and cream. This isn’t just another **Cookies and Cream Cookie Recipe**; it’s the result of countless batches and late-night tweaks to capture that perfect balance of crunchy chocolate cookie bits and creamy, sweet cookie dough. It’s the recipe my friends beg for and the one that disappears from the cookie jar first. These cookies are wonderfully soft and chewy in the center with slightly crisp edges, packed to the brim with Oreo chunks and sweet white chocolate chips. They truly taste like one of the best **Flavors Of Cookies** you can imagine, transformed into a warm, gooey treat.
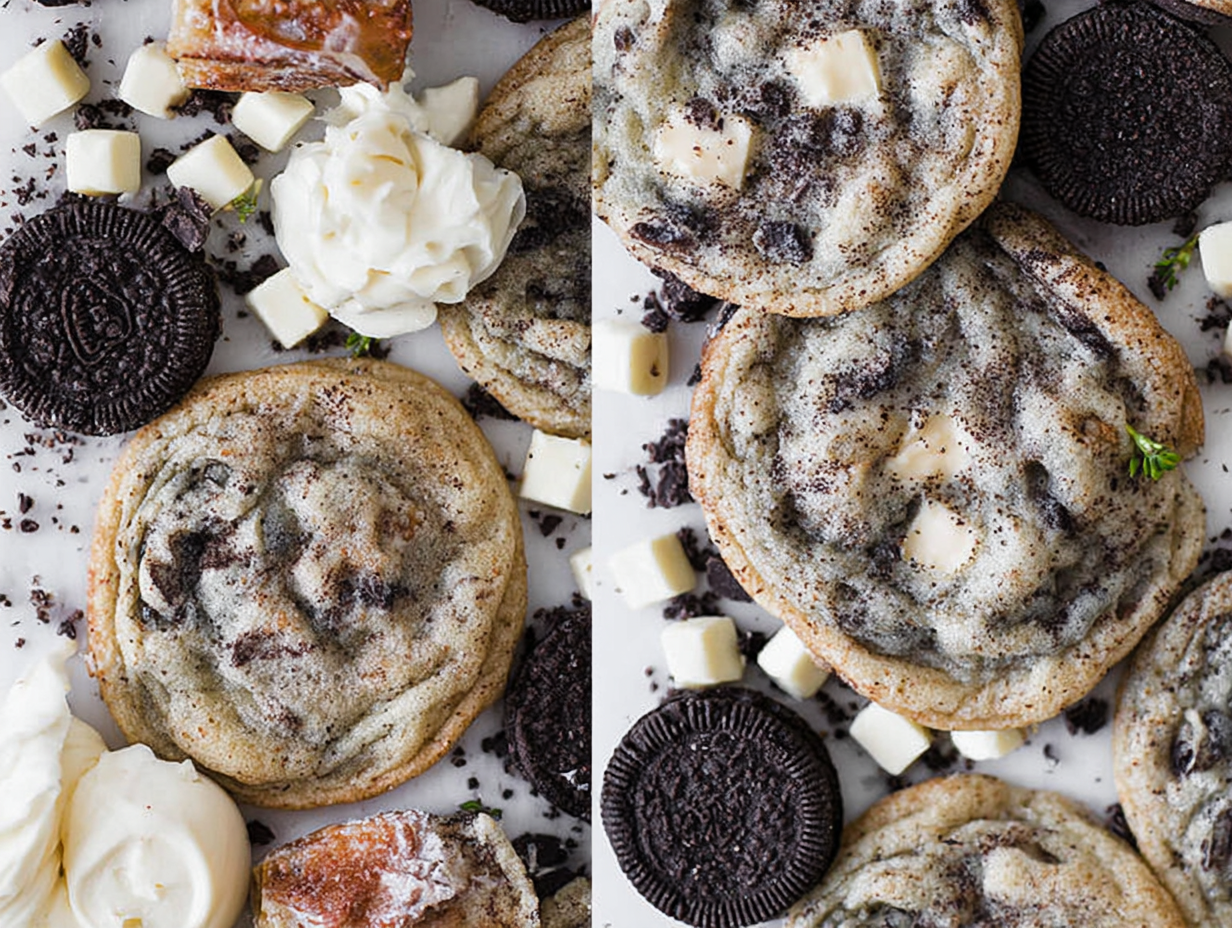
What makes this recipe stand out is the texture. We use a secret weapon, cornstarch, to create an incredibly tender crumb that practically melts in your mouth. This isn’t a dry, crunchy cookie. It’s a rich, decadent experience that perfectly mimics the joy of eating cookies and cream ice cream, making them one of those perfect **Desserts That Go With Ice Cream** (or taste like it!). If you’ve been searching for the ultimate recipe for **Cookies With Oreos In Them**, your search is over. This is more than just a dessert; it’s a little piece of comfort, a guaranteed smile, and a recipe that will become a cherished part of your baking rotation.
Ingredients for This Cookies and Cream Cookie Recipe
- 1 cup + 2 tablespoons all-purpose flour
- 1 teaspoon cornstarch
- 3/4 teaspoon baking powder
- 1/2 teaspoon baking soda
- 1/2 teaspoon salt
- 4 tablespoons unsalted butter (softened, at room temperature)
- 1/2 cup plus 2 tablespoons granulated sugar
- 1 large egg
- 1 teaspoon vanilla extract
- 10 Oreo or chocolate sandwich cookies (coarsely chopped)
- 1/2 cup white chocolate chips
Step-by-Step Instructions
- Prep Your Station: First things first, preheat your oven to 350°F (175°C). This is crucial for getting the cookies to bake evenly. Go ahead and line two baking sheets with parchment paper or silicone mats. This prevents sticking and makes cleanup a breeze.
- Combine Dry Ingredients: In a medium-sized bowl, whisk together the all-purpose flour, cornstarch, baking powder, baking soda, and salt. Whisking them together now ensures that the leavening agents are evenly distributed, which helps the cookies rise properly. Set this bowl aside for later.
- Cream Butter and Sugar: In a separate, larger bowl (or the bowl of a stand mixer), beat the softened unsalted butter and granulated sugar together on medium speed until the mixture is light and fluffy. This step incorporates air into the dough, which is key for a tender texture. This should take about 2-3 minutes.
- Add Wet Ingredients: Add the large egg and pure vanilla extract to the butter and sugar mixture. Mix everything together until it’s smooth and creamy. Don’t forget to scrape down the sides of the bowl with a spatula to make sure everything is well combined.
- Form the Dough: Reduce the mixer speed to low and slowly add the dry ingredient mixture to the wet ingredients. Mix only until the flour is *just* combined. Overmixing can lead to tough cookies, so be careful here! Now, gently fold in the coarsely chopped Oreo cookies and the white chocolate chips.
- Scoop and Bake: Using a cookie scoop (about 2 tablespoons worth), portion out the dough and roll each portion into a ball. Place them on your prepared baking sheets, leaving a couple of inches between them for spreading. Gently press down on the tops of the dough balls just a little bit to flatten them slightly.
- Bake to Perfection: Bake for 8-10 minutes. The key is to look for edges that are set and lightly golden. The centers should still look a little soft and underbaked—this is the secret to a chewy cookie! They will continue to bake on the hot pan after you take them out.
- Cool and Enjoy: Let the cookies cool on the baking sheet for at least 5 minutes before carefully transferring them to a wire rack to cool completely. This waiting period is tough, but it allows them to set up properly. Once cooled, they are ready to be devoured!
Tips & Tricks for the Best Cookies and Cream Cookie Recipe
After making this **Cookies And Cream Recipe** more times than I can count, I’ve picked up a few little secrets that take these cookies from good to absolutely unforgettable. First, don’t skip the cornstarch. It might seem like an odd ingredient, but it’s the key to that incredibly soft, tender texture that makes these cookies so special. It tenderizes the crumb and prevents the cookies from becoming too cakey. Another huge tip is to manage your dough temperature. If your kitchen is warm, or if you find your cookies are spreading too much, chilling the dough for just 30 minutes before baking can make a world of difference. This solidifies the butter, ensuring the cookies bake up thicker and chewier instead of spreading into thin crisps. It’s a simple step that makes a huge impact on the final result.
When it comes to the mix-ins, the size of your Oreo chunks matters. You don’t want to pulverize them into dust. Aim for a coarse chop with a mix of small pieces and some larger, pea-sized chunks. This gives you a wonderful variety of textures in every bite. I usually just place them in a zip-top bag and give them a few gentle whacks with a rolling pin. Lastly, and this is probably the most important tip, do not overbake these cookies. Pull them from the oven when the centers still look slightly gooey. They will firm up as they cool on the baking sheet, leaving you with that perfect chewy-on-the-inside, crisp-on-the-outside texture. Trusting the process and pulling them out a minute early is the ultimate secret to success.
How do I get my cookies to look perfectly round and professional?
If you’re looking for some **Fancy Cookie Ideas** to make your batch picture-perfect, the trick is to “scoot” them. As soon as the cookies come out of the oven, while they are still hot and pliable on the parchment paper, take a round cookie cutter or the rim of a glass that is slightly larger than the cookie. Place it over the cookie and gently swirl it around the edges. This will tuck in any uneven bits and create a perfectly circular shape. You can also press a few extra Oreo chunks and white chocolate chips onto the tops of the dough balls right before baking for that bakery-style look.
Substitutions and Variations
One of the best things about baking at home is the ability to customize **Different Types Of Cookies Recipes** to your exact liking. This cookies and cream cookie recipe is a fantastic base for experimentation. If you’re not a fan of white chocolate, feel free to swap the white chocolate chips for semi-sweet, milk chocolate, or even dark chocolate chunks. A dark chocolate version offers a rich, less sweet counterpoint to the Oreos that is absolutely delicious. You can also explore different varieties of Oreo cookies. Mint Oreos with dark chocolate chips create a decadent thin-mint-inspired cookie, while Golden Oreos with white chocolate chips offer a lovely vanilla and cream flavor profile.
For those who love extra crunch and flavor, consider adding a handful of chopped nuts like pecans or macadamia nuts. This adds a wonderful textural contrast and a nutty depth of flavor. If you want to get creative with **Cookies With Candy**, try adding chopped Hershey’s Cookies ‘n’ Creme bars instead of, or in addition to, the white chocolate chips for an even more intense cookies and cream experience. For a slightly tangier, cheesecake-like flavor, you can try adding a tablespoon of cream cheese to the butter and sugar when you are creaming them together. This will make the cookies even softer and add a subtle, delightful tang.
Can I make this recipe with gluten-free flour?
Yes, you can adapt this recipe to be gluten-free. For the best results, use a high-quality “measure-for-measure” or “1-to-1” gluten-free flour blend that contains xanthan gum. This will provide the structure that gluten normally would. Also, be sure to use certified gluten-free chocolate sandwich cookies. The texture may be slightly different—often a bit sandier or denser—but they will still be incredibly delicious.
Frequently Asked Questions About This Cookies and Cream Cookie Recipe
Can I make the cookie dough ahead of time?
Absolutely! This dough is perfect for making ahead. You can prepare the dough, cover the bowl tightly with plastic wrap, and refrigerate it for up to 3 days. Chilling the dough actually enhances the flavor. When you’re ready to bake, just let it sit at room temperature for about 15-20 minutes to make it easier to scoop, then bake as directed. You might need to add an extra minute or two to the baking time.
How should I store these cookies to keep them fresh?
To keep your cookies soft and chewy, store them in an airtight container at room temperature. They will stay fresh for up to 5 days. For an extra trick to maintain softness, you can place a slice of bread in the container with the cookies. The cookies will absorb moisture from the bread, helping them stay tender.
Why did my cookies spread too much and become flat?
This is a common cookie conundrum! The most likely culprit is butter that was too soft or melted. Your butter should be at room temperature but still firm enough to hold its shape. If your butter is overly soft, the dough will be too warm and will spread rapidly in the oven. Another reason could be not measuring the flour correctly. Be sure to spoon your flour into the measuring cup and level it off, rather than scooping it directly from the bag, which can compact it. If you continue to have issues, chilling the dough for 30-60 minutes before baking is the best way to prevent spreading.
Our Final Thoughts on This Recipe
There’s a special kind of magic in pulling a tray of warm, perfect cookies from the oven. This **Cookies and Cream Cookie Recipe** is more than just a set of instructions; it’s an invitation to create a moment of pure joy. The aroma that fills your kitchen, the sight of those beautiful cookies studded with Oreo pieces, and that first incredible bite make the entire process worthwhile. These are the kind of cookies that bring people together, whether you’re baking for family, friends, or just for yourself. They are the perfect comforting snack and one of the best **Desserts That Go With Ice Cream**—or a tall glass of milk. I truly hope you love this recipe as much as I do and that it becomes a go-to favorite in your home.
Cookies and Cream Cookie Recipe
Ingredients
Equipment
Method
- Prep Your Station: First things first, preheat your oven to 350°F (175°C). This is crucial for getting the cookies to bake evenly. Go ahead and line two baking sheets with parchment paper or silicone mats. This prevents sticking and makes cleanup a breeze.
- Combine Dry Ingredients: In a medium-sized bowl, whisk together the all-purpose flour, cornstarch, baking powder, baking soda, and salt. Whisking them together now ensures that the leavening agents are evenly distributed, which helps the cookies rise properly. Set this bowl aside for later.
- Cream Butter and Sugar: In a separate, larger bowl (or the bowl of a stand mixer), beat the softened unsalted butter and granulated sugar together on medium speed until the mixture is light and fluffy. This step incorporates air into the dough, which is key for a tender texture. This should take about 2-3 minutes.
- Add Wet Ingredients: Add the large egg and pure vanilla extract to the butter and sugar mixture. Mix everything together until it’s smooth and creamy. Don’t forget to scrape down the sides of the bowl with a spatula to make sure everything is well combined.
- Form the Dough: Reduce the mixer speed to low and slowly add the dry ingredient mixture to the wet ingredients. Mix only until the flour is *just* combined. Overmixing can lead to tough cookies, so be careful here! Now, gently fold in the coarsely chopped Oreo cookies and the white chocolate chips.
- Scoop and Bake: Using a cookie scoop (about 2 tablespoons worth), portion out the dough and roll each portion into a ball. Place them on your prepared baking sheets, leaving a couple of inches between them for spreading. Gently press down on the tops of the dough balls just a little bit to flatten them slightly.
- Bake to Perfection: Bake for 8-10 minutes. The key is to look for edges that are set and lightly golden. The centers should still look a little soft and underbaked—this is the secret to a chewy cookie! They will continue to bake on the hot pan after you take them out.
- Cool and Enjoy: Let the cookies cool on the baking sheet for at least 5 minutes before carefully transferring them to a wire rack to cool completely. This waiting period is tough, but it allows them to set up properly. Once cooled, they are ready to be devoured!