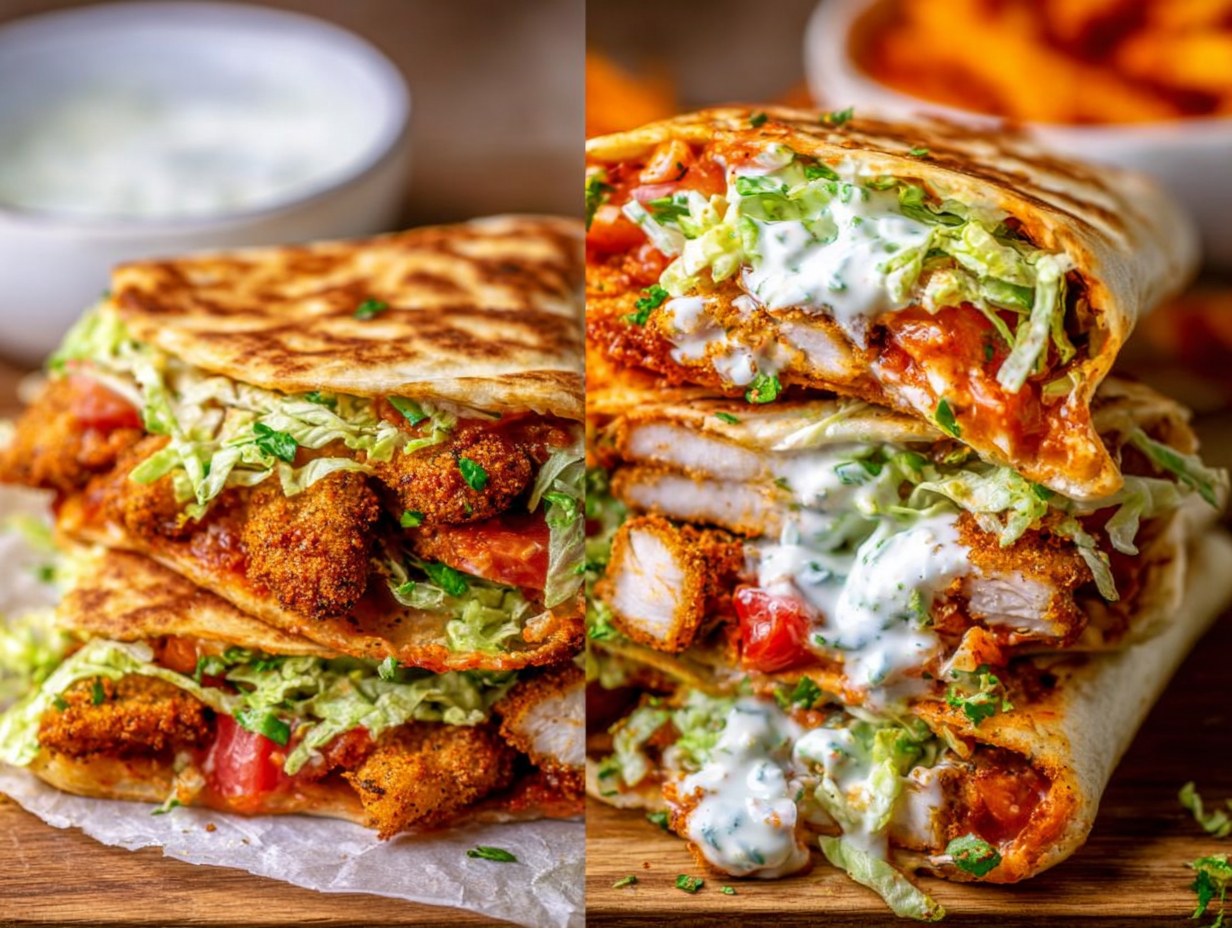
There’s something incredibly satisfying about recreating a fast-food favorite at home, and this Chicken Crunch Wrap recipe is proof. I used to think that magical combination of soft tortilla, crunchy shell, savory filling, and melty cheese was something best left to the pros. But I was so wrong. Making your own crunch wrap isn’t just possible; it’s a game-changer. You get to control every single ingredient, packing it with fresh, wholesome goodness without sacrificing that crave-worthy texture and flavor. This isn’t just a copycat recipe; it’s an upgrade. It’s the perfect answer for a fun Chicken Dinner that gets everyone excited, and it’s become one of my absolute favorite Lunch Recipes for a midday meal that actually feels like a treat.
What I love most is the sheer versatility. This recipe is a fantastic template for whatever you have on hand. Leftover rotisserie chicken? Perfect. Want to load it up with black beans and corn? Go for it. It’s one of those brilliant Wrap Recipes that works for a quick weeknight meal, a lazy weekend lunch, or even as a fantastic option for Healthy Meal Prep. You can prep all the components ahead of time and assemble them in minutes. The result is a perfectly golden, crispy parcel filled with juicy, seasoned chicken, creamy sauces, and fresh toppings. It’s a delicious, budget-friendly meal that brings big flavor without the drive-thru.
Ingredients for Your Chicken Crunch Wrap
- Cooked Chicken: 2 cups, shredded or chopped. Both chicken breast or thighs work beautifully here.
- Olive Oil: 2 tbsp, for warming the chicken.
- Taco Seasoning: 2 tbsp. Use your favorite store-bought packet or a homemade blend.
- Large Flour Tortillas: 4, burrito-sized. Warming them slightly makes folding a breeze.
- Small Corn Tortillas: 4, for that essential crunchy layer inside.
- Shredded Lettuce: 1 cup. Iceberg or romaine adds a cool, crisp bite.
- Shredded Cheese: 1 cup. A Mexican blend, cheddar, or Monterey Jack are all great choices.
- Sour Cream: ½ cup. You can also use Greek yogurt for a lighter, tangy alternative.
- Salsa: ½ cup. Go with your favorite jarred salsa or fresh pico de gallo.
- Hot Sauce: 2 tbsp (optional), for those who like a little extra heat.
- Ranch or Chipotle Mayo: 2 tbsp (optional), for an extra layer of creamy flavor.
- Optional Add-ins: Diced tomatoes, black beans, corn, pickled jalapeños, or guacamole.
Step-by-Step Instructions
- Season the Chicken: Heat the olive oil in a medium skillet over medium heat. Add your cooked, shredded chicken and sprinkle the taco seasoning over it. Stir everything together until the chicken is coated and warmed through, about 3-4 minutes. This step is crucial for infusing the star of our Healthy Chicken recipe with flavor. Set it aside and keep it warm.
- Prep Your Station: This is key to a smooth assembly line! Gently warm the large flour tortillas in the microwave for about 30 seconds to make them soft and pliable. Set out all your other ingredients—lettuce, cheese, sour cream, salsa, and any other toppings—in small bowls. Having everything ready to go makes building the wraps quick and fun.
- Build the Layers: Lay a large flour tortilla flat. Place a small corn tortilla right in the center; this is the secret to the “crunch.” Now, layer your ingredients directly on top of the corn tortilla. Start with a generous portion of the warm seasoned chicken, followed by a dollop of sour cream and salsa. Sprinkle a good amount of shredded cheese, then top with lettuce and any of your optional extras. Try to keep the fillings contained in the center to make folding easier.
- Fold It Up: This is the trickiest part, but you’ll get the hang of it quickly. Start with one edge of the flour tortilla and fold it tightly over the center of the filling. Continue working your way around the circle, making small, overlapping folds until the entire filling is enclosed. It should look like a hexagon when you’re done.
- Get It Crispy: Place a clean skillet over medium heat (no oil needed). Carefully place the wrap seam-side down in the hot skillet. This helps seal the folds together. Cook for 2-3 minutes, or until the bottom is golden brown and crispy. Gently flip it over and cook for another 2-3 minutes on the other side. You’re looking for that perfect toasty finish that makes this one of the best Mexican Food Recipes. Remove from the skillet, slice in half, and serve immediately while it’s hot and melty.
Tips & Tricks for the Best Chicken Crunch Wrap
After making this Chicken Crunch Wrap more times than I can count, I’ve picked up a few little secrets that make a huge difference. First, let’s talk about the crunch. While the recipe calls for a plain corn tortilla in the middle, you can elevate the texture by toasting it first. Just pop it in a dry skillet for a minute per side until it’s lightly crisp. This extra step ensures your center stays crunchy even after it’s loaded with creamy and moist ingredients. Another key tip is to avoid overfilling. I know it’s tempting to stuff it with as much goodness as possible, but a wrap that’s too full is nearly impossible to fold neatly and is prone to bursting open in the pan. A modest, even layer of each ingredient is the way to go.
The folding technique is where many people get nervous, but the most important trick is to use warm, pliable flour tortillas. If they’re cold or stiff, they will tear. A quick 20-30 seconds in the microwave wrapped in a damp paper towel works wonders. When you’re cooking the wrap, don’t be afraid to press it down gently with a spatula. This helps create a better seal and ensures maximum contact with the pan for an evenly golden-brown, crispy crust. It’s this final step that transforms it from a simple wrap into a true crunch wrap experience, making it a standout among Chicken Wraps. And remember, always start cooking it seam-side down to lock in all those delicious fillings.
How do I prevent my crunch wrap from getting soggy?
Sogginess is the enemy of a good crunch wrap! The best way to combat it is through strategic layering. Place your “wet” ingredients like sour cream and salsa directly onto the chicken, which acts as a barrier. Then, pile on the cheese and finish with the lettuce. This keeps the crisp lettuce from wilting and the sauces from seeping into the tortilla too quickly. Also, be sure to serve it immediately after cooking. This dish is at its peak when it’s fresh from the skillet, with a hot, melty interior and a super crispy exterior.
Substitutions and Fun Variations
The beauty of this Crunch Wrap recipe is how easily you can adapt it to your taste or what you have in your kitchen. It’s one of the most forgiving Wrap Recipes out there. Don’t have cooked chicken? Ground beef, ground turkey, or even leftover shredded pork carnitas seasoned with taco seasoning are all fantastic protein substitutes. For a vegetarian version, a hearty mix of black beans and corn, or some seasoned crumbled tofu works wonderfully. You can truly make this fit any diet or preference.
Feel free to get creative with the sauces and cheeses. Instead of sour cream, try a smear of guacamole or a zesty avocado crema. Swap the salsa for a smoky chipotle-lime mayo or a creamy jalapeño ranch for a different flavor profile. The cheese can also be changed up; pepper jack will add a little kick, while a simple Monterey Jack offers a superior melt. You can also add more nutritional value by sneaking in some finely chopped spinach or bell peppers with the chicken. This flexibility is why it’s such a great recipe for a family Chicken Dinner—everyone can customize their own!
Frequently Asked Questions
Can I make these Chicken Wraps ahead of time?
Yes, this recipe is great for Healthy Meal Prep. You can cook the chicken and chop all your veggies and toppings in advance, storing them in separate airtight containers in the fridge. When you’re ready to eat, all you have to do is assemble and grill the wraps, which takes less than 10 minutes. I don’t recommend fully assembling and grilling them ahead of time, as they will lose their signature crunch upon reheating.
How do I store and reheat leftovers?
If you have a leftover crunch wrap, wrap it tightly in foil and store it in the refrigerator for up to 2 days. The best way to reheat it and bring back some of the crispiness is in a dry skillet over medium-low heat or in an air fryer at 350°F (175°C) for about 5-7 minutes. Microwaving is not recommended as it will make the tortilla soft and soggy.
Is this Chicken Crunch Wrap recipe healthy?
It can definitely be a Healthy Chicken meal! Because you’re making it at home, you have full control. You can use lean chicken breast, load it up with fresh vegetables like lettuce and tomatoes, use Greek yogurt instead of sour cream to increase protein, and opt for a low-carb tortilla. It’s a much healthier alternative to its fast-food counterpart, offering a balanced mix of protein, carbs, and fats.
Conclusion
This homemade Chicken Crunch Wrap is more than just a recipe; it’s a fun, hands-on cooking experience that delivers incredibly delicious results. It’s the joy of hearing that perfect crunch as you slice it in half and seeing the beautiful layers you created. Whether you’re making it for a quick weeknight Chicken Dinner or preparing a satisfying Healthy Lunch, it’s a meal that never fails to impress. I truly hope you give this recipe a try and discover how easy and rewarding it is to make your own perfect crunch wrap at home. It’s a keeper in my house, and I’m sure it will be in yours too.