I still remember the first time I tried making this Decadent S’mores Cheesecake for a family gathering. My nephew had just returned from summer camp, eyes bright with stories about campfire nights. He kept asking if we could roast marshmallows, but our tiny backyard wasn’t exactly set up for that. So I thought why not bring the campfire to the dessert table? That night, after everyone had gone to bed, I stayed up experimenting in the kitchen.
The result? A showstopper that’s become my secret weapon for every dessert competition and potluck since. This isn’t just another entry in the world of cheesecakes recipes easy to follow—it’s a memory wrapped in layers of graham cracker, cream cheese, and toasted marshmallow bliss.
Why This Belongs in Contest Winning Desserts
There’s something magical about transforming childhood memories into sophisticated circular desserts that make adults weak in the knees. This Decadent S’mores Cheesecake takes everything you loved about campfire treats and elevates it into something worthy of a dessert contest ribbon. The graham cracker foundation isn’t just crushed and pressed it’s intentionally crafted with a hint of cinnamon that nobody can quite identify but everyone raves about. That’s the kind of detail that separates good cheesecake recipes from genuinely unforgettable ones.
What makes this particular creation stand out among party cheesecake cups and traditional round desserts is the textural journey. Each forkful takes you through crispy crust, velvety filling studded with melted chocolate pockets, and those golden-charred marshmallows on top that crack slightly before revealing their gooey centers. I’ve watched judges at local dessert competitions close their eyes with that first bite—that’s when you know you’ve created something special.
The Foundation: Building Your Graham Base
Every cheesecake filled cake needs a solid foundation, and this one starts with 2 cups of finely ground graham crackers mixed with 6 tablespoons of melted butter and 3 tablespoons of sugar. Here’s what the cookbooks won’t tell you: pulse your crackers until they’re the texture of coarse sand, not dust. You want tiny pieces that’ll create little pockets of crunch. Press this mixture into your 9-inch springform pan with the bottom of a measuring cup use real pressure here, almost like you’re angry at it. That compression is what prevents your crust from crumbling later.
Bake this foundation at 325°F for exactly 10 minutes, no more. The edges should just barely start to darken. While it cools, you’ll catch that warm graham scent filling your kitchen, and suddenly you’re eight years old again, breaking crackers by the fire.
Creating the Filling for Yummy Cheesecake Recipes
This is where those yummy cheesecake recipes you’ve bookmarked get left in the dust. Start with 24 ounces of cream cheese—it must be room temperature, or you’ll chase lumps around your bowl for fifteen frustrating minutes. Beat it alone for two full minutes until it’s fluffy and lighter in color. Gradually add 1 cup of sugar, then 1 cup of sour cream, 2 teaspoons of vanilla extract, and a pinch of salt that most recipes forget but shouldn’t.
Add three eggs one at a time, beating on the lowest speed after each addition. This is crucial—overmixing creates air bubbles that become cracks later. Nobody wants a cracked entry in a dessert competition. Gently fold in 1 cup of mini marshmallows and 3/4 cup of chocolate chips by hand. Some will sink, some will float. That randomness is perfect—it means every slice tells a slightly different story.
The Baking Process Secrets
Pour your filling over that cooled crust and tap the pan firmly on your counter three times. You’re coaxing out trapped air bubbles. Bake at 325°F for 60-70 minutes, but here’s the insider tip: the center should still jiggle like it’s nervous when you gently shake the pan. That wobble means it’s perfect—it’ll firm up as it cools. An instant-read thermometer should hit 145°F in the center.
Turn off the oven but don’t open the door. Let your cheesecake sit in there for one hour as the oven gradually cools. This prevents that dramatic temperature shock that causes cracks. After that hour, crack the door and let it sit another 30 minutes. Only then should you move it to your counter to cool completely before refrigerating overnight.
Pro Tips for Party Cheesecake Cups Adaptation
- Want to serve this as party cheesecake cups? Divide the recipe among 12 muffin tins lined with paper cups, reducing baking time to 20-25 minutes
- Use a water bath (place springform pan in a larger pan with 1 inch of hot water) for even more insurance against cracks
- Run a thin knife around the pan edge while still slightly warm to prevent the cheesecake from pulling and cracking
- For the cleanest slices, wipe your knife with a hot damp towel between each cut
- If cracks do appear, don’t panic—that’s what the ganache and marshmallow topping are for
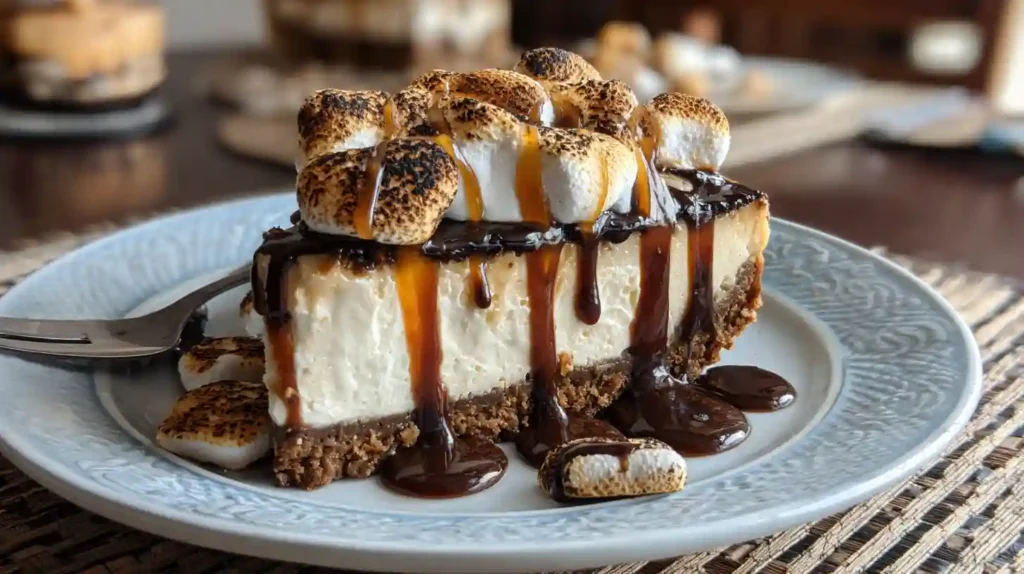
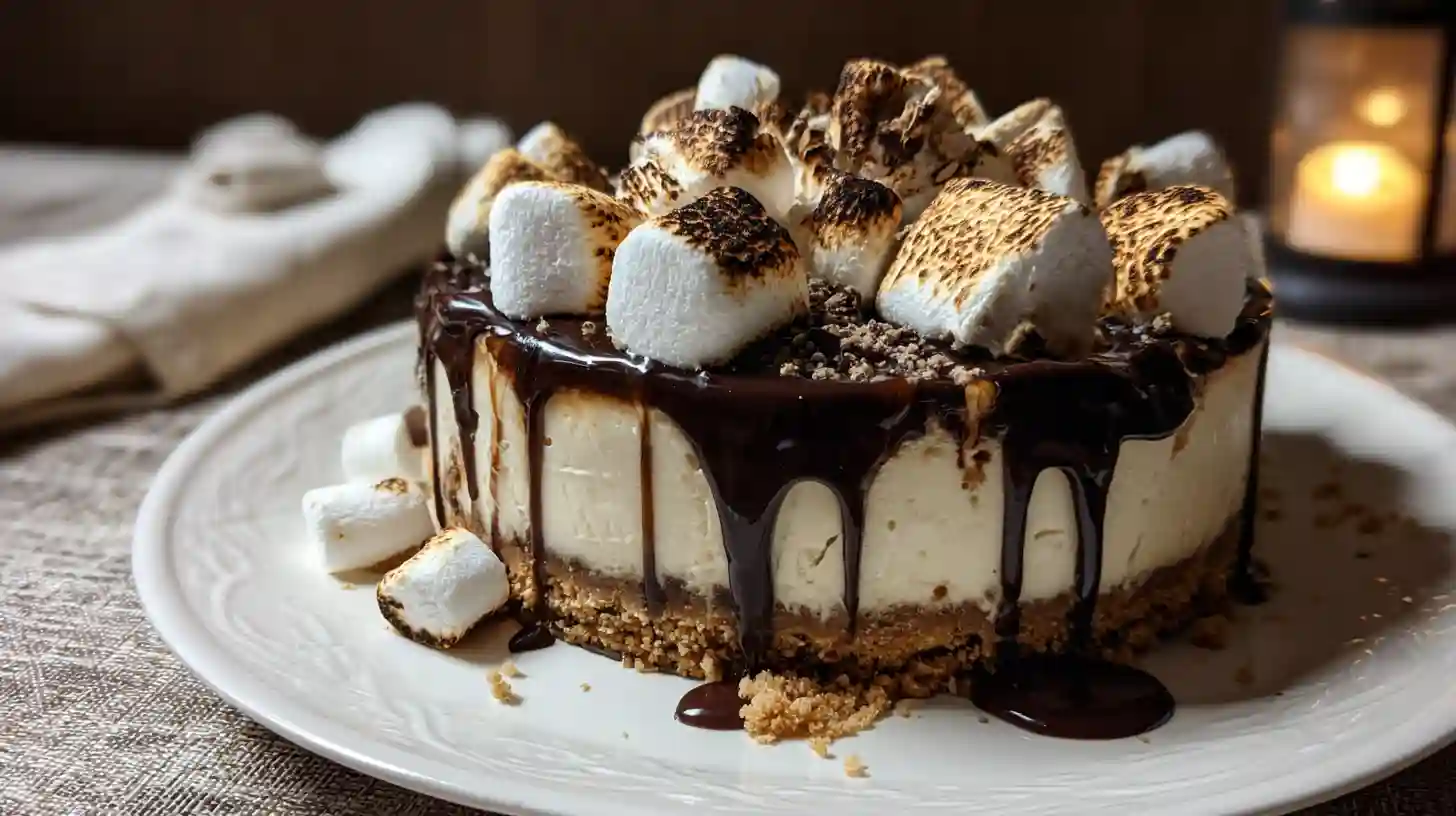
The Chocolate Ganache Layer
After your cheesecake has spent the night in the refrigerator getting acquainted with itself, it’s time for the ganache. Heat 3/4 cup of heavy cream until tiny bubbles form around the edges—don’t let it actually boil. Pour this over 1 cup of milk chocolate chips in a heatproof bowl. Wait two minutes without touching it. This patience lets the heat do its work. Then whisk from the center outward until it’s glossy and smooth as silk.
Pour this over your chilled cheesecake, using an offset spatula to coax it right to the edges. Some will drip down the sides, and that’s not just okay—it’s ideal. Those drips are what make circular desserts look professionally done. Let this set for 30 minutes in the refrigerator.
Variations Worth Trying
- Dark Chocolate Version: Swap milk chocolate for 60% cacao dark chocolate for a more sophisticated dessert competition entry
- Peanut Butter Twist: Add 1/2 cup of peanut butter to the filling for a Reese’s-inspired variation
- Salted Caramel S’mores: Drizzle salted caramel between the ganache and marshmallow layers
- Boozy Adult Version: Add 2 tablespoons of bourbon or Baileys to the filling
- Mini Individual Portions: Create cheesecake filled cake bites using a mini muffin tin for elegant party servings
The Grand Finale: Toasted Marshmallows
This is where you become an artist. Arrange jumbo marshmallows across the top—I like doing it in a pattern that looks random but is actually carefully spaced. If you have a kitchen torch, use it to toast these until they’re golden with those characteristic dark patches. Move the flame constantly, letting it kiss each marshmallow for just 2-3 seconds before moving on. No torch? Your oven’s broiler works, but watch it like your life depends on it. The line between perfect and carbonized is about 30 seconds.
For true decadence, drizzle a bit more of that ganache over the toasted marshmallows while they’re still warm. It’ll pool in the crevices and create little chocolate rivers through the marshmallow landscape.
Troubleshooting Common Issues
- Cracked surface: Temperature fluctuations are the usual culprit—follow the gradual cooling method above
- Soggy crust: Not enough butter or insufficiently pressed crust is the cause; press harder next time
- Marshmallows won’t toast: Make sure they’re completely dry on the surface; pat with paper towels if needed
- Ganache too thick: Warm it for 10 seconds in the microwave and stir until it flows again
- Filling too soft: Ensure it reached 145°F internally and give it a full 24 hours in the refrigerator
Smart Substitutions
- Regular cream cheese works fine; no need for expensive brands
- Greek yogurt can replace half the sour cream for a tangier profile
- White chocolate creates a sweeter, less traditional variation
- Gluten-free graham crackers work perfectly for those with dietary restrictions
- Coconut cream can substitute heavy cream for dairy-free ganache
Storage and Serving Wisdom
This masterpiece keeps for 5 days covered in the refrigerator, though I’ve never seen one last that long. The marshmallows will soften slightly after a day, which honestly makes them even better—more integrated with the ganache. You can freeze undecorated cheesecake for up to 3 months. Just thaw it overnight in the refrigerator before adding ganache and marshmallows.
For serving, let slices sit at room temperature for 15 minutes. Cold cheesecake is dense; slightly warmed, it becomes creamy and luxurious. If you want to impress at a dessert contest, warm individual slices for 10 seconds in the microwave just before serving—those chocolate chips will soften again, creating molten pockets of chocolate throughout.
Frequently Asked Questions
Can I make this Decadent S’mores Cheesecake ahead of time?
Absolutely. In fact, cheesecake improves with time. Make it up to 3 days before you need it, but add the marshmallow topping the day you’re serving for the best texture and appearance.
What’s the best way to prevent cracks in contest winning desserts?
Room temperature ingredients, gentle mixing, gradual cooling, and not overbaking are your best defenses. The center should still wobble when you remove it from the oven.
Can I adapt this recipe for party cheesecake cups?
Yes! Divide the recipe among lined muffin tins and reduce baking time to 20-25 minutes. These make perfect individual portions for dessert competitions or parties.
How do I know when the cheesecake is properly done?
The edges should be set and slightly puffed, while the center jiggles like gelatin when gently shaken. An instant-read thermometer should register 145°F in the center.
What makes this different from other good cheesecake recipes?
The combination of chocolate chips and marshmallows baked directly into the filling creates pockets of melted goodness throughout, while the toasted marshmallow topping adds authentic s’mores character that other recipes lack.
Why use milk chocolate instead of dark for the ganache?
Traditional s’mores use milk chocolate, and it provides a sweeter, nostalgic flavor that balances the tangy cream cheese. However, dark chocolate creates a more sophisticated dessert competition entry if you prefer less sweetness.
Can I skip the water bath method?
Yes, but using one provides even heat distribution and moisture that helps prevent cracks. If you skip it, follow the gradual cooling method religiously and use an oven thermometer to ensure accurate temperature.
Decadent S’mores Cheesecake
Ingredients
Equipment
Method
- Prepare the crust: Preheat oven to 325°F (163°C). Mix graham cracker crumbs, melted butter, and sugar until well combined. Press firmly into the bottom of a 9-inch springform pan. Bake for 10 minutes, then cool completely.
- Make the filling: Beat cream cheese on medium speed for 2 minutes until fluffy. Gradually add sugar, then mix in sour cream, vanilla, and salt until smooth. Add eggs one at a time on low speed, mixing just until incorporated.
- Fold in mix-ins: Gently fold mini marshmallows and chocolate chips into the batter by hand. Pour filling over cooled crust and tap pan on counter three times to release air bubbles.
- Bake the cheesecake: Bake at 325°F for 60-70 minutes until edges are set but center still jiggles slightly (internal temperature should reach 145°F). Turn off oven and let cheesecake sit inside with door closed for 1 hour.
- Cool gradually: Crack oven door and let cheesecake sit for 30 more minutes. Remove from oven and cool completely at room temperature, then refrigerate overnight or at least 8 hours.
- Prepare ganache: Heat heavy cream until small bubbles form around edges. Pour over chocolate chips in a bowl, let sit 2 minutes, then whisk from center outward until smooth and glossy. Pour over chilled cheesecake and refrigerate 30 minutes to set.
- Toast marshmallows: Arrange jumbo marshmallows on top of ganache. Use a kitchen torch to toast marshmallows until golden with caramelized patches, or broil for 30-60 seconds watching carefully. Drizzle with extra ganache if desired.
- Serve: Let cheesecake sit at room temperature for 15 minutes before slicing. Wipe knife clean between cuts for neat slices. Store covered in refrigerator for up to 5 days.