There’s something undeniably romantic about the classic combination of chocolate and strawberries. It’s a pairing reserved for special moments and decadent treats. These Chocolate Covered Strawberry Cookies take that iconic flavor duo and transform it into a chewy, rich, and utterly unforgettable cookie. This isn’t just a chocolate cookie with a hint of fruit; it’s a full-on flavor experience. We use Dutch-processed cocoa powder for a deep, dark chocolate base, stud it with both semisweet chocolate chips and intensely flavorful freeze-dried strawberries, and then, for the final touch of luxury, we dip the entire bottom in a smooth, glossy layer of melted chocolate. It’s the perfect way to capture the essence of a fancy dessert in a humble, homemade cookie.
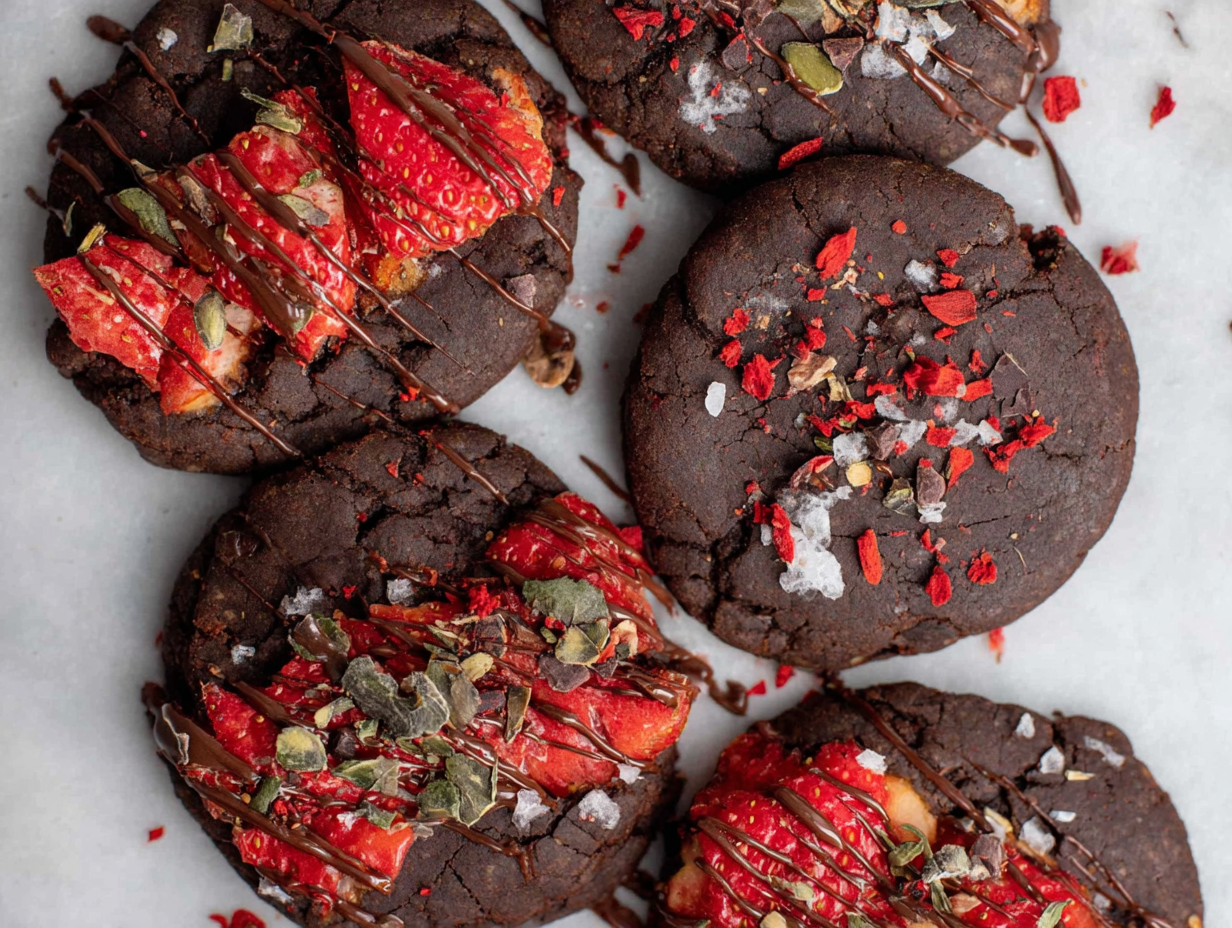
What makes this recipe truly special is the use of freeze-dried strawberries. Unlike fresh berries, which would add too much moisture and make the cookies cakey, the freeze-dried version provides a concentrated burst of pure, sweet-tart strawberry flavor in every single bite. They soften slightly as they bake, creating little pockets of chewy, fruity goodness that perfectly complement the rich chocolate. Whether you’re making these for a loved one, a bake sale, or just a Tuesday afternoon pick-me-up, these cookies feel like an event. They’re a little bit fancy, a whole lot of delicious, and surprisingly simple to bring together. This is one of those Chicken Dinner Recipes you’ll find yourself coming back to again and again.
Ingredients for Chocolate Covered Strawberry Cookies
This recipe relies on a handful of pantry staples, plus one special ingredient that makes all the difference. The key is using quality components, as their flavors really shine through in the final cookie. The Dutch-processed cocoa powder provides a smoother, less acidic chocolate flavor than natural cocoa, which pairs beautifully with the sweet berries. And of course, the freeze-dried strawberries are the star, offering an intense fruitiness you just can’t get from anything else. Before you begin, gather all your ingredients to make the process smooth and enjoyable. It’s a good practice for any baking project, but especially helpful here when you have a few different components to bring together. This isn’t a complex Chicken Marsala, but being organized always helps!
For the Cookies:
- ½ cup (1 stick) unsalted butter, at room temperature
- 1 cup packed light brown sugar
- 1 large egg, at room temperature
- 2 teaspoons vanilla extract
- 1 ¼ cups all-purpose flour
- ⅓ cup Dutch-processed cocoa powder
- ½ teaspoon baking soda
- 1/4 teaspoon baking powder
- ½ teaspoon salt
- 1 cup freeze-dried strawberries, lightly crushed
- 1 cup semisweet chocolate chips
For the Chocolate Coating:
- 1 cup semisweet chocolate chips
- 1 teaspoon coconut oil
FAQ: Why use room temperature butter and eggs?
It might seem like a small detail, but using room temperature ingredients is crucial for the texture of your cookies. Cold butter won’t cream properly with the sugar, resulting in a dense, heavy dough. Room temperature butter and eggs trap air more efficiently, creating an emulsion that leads to lighter, chewier, and more evenly baked cookies. It’s a simple step that makes a huge difference in the final product.
How to Make Chocolate Covered Strawberry Cookies
Bringing these cookies to life is a straightforward and rewarding process. We’ll start by creating a rich, chocolatey dough, folding in our key ingredients, and baking them just until they’re perfectly set. The final step of dipping them in chocolate is where they transform from delicious cookies into truly show-stopping treats. Don’t rush the cooling steps; they are essential for ensuring the cookies hold their shape and the chocolate sets properly. Follow along, and you’ll have a batch of bakery-worthy Chocolate Covered Strawberry Cookies in no time. This process is much simpler than preparing a classic Coq Au Vin, but the results are just as impressive in the dessert world.
- Prep Your Station: First things first, preheat your oven to 350°F and line two large baking sheets with parchment paper. This prevents the cookies from sticking and makes cleanup a breeze.
- Cream Butter and Sugar: In a large bowl with a hand mixer or in the bowl of a stand mixer, beat the room temperature butter and brown sugar together on medium speed until the mixture is light, fluffy, and looks like wet sand. This should take about 2-3 minutes.
- Add Wet Ingredients: Scrape down the sides of the bowl. Add the egg and vanilla extract and beat again on medium-high speed for another 2 minutes until the mixture is pale and airy. This step incorporates air, which is key for a good cookie texture.
- Combine Dry Ingredients: Add the flour, cocoa powder, baking soda, baking powder, and salt to the bowl. Mix on the lowest speed until just a few streaks of flour remain. Don’t overmix here!
- Fold in the Good Stuff: Gently fold in the freeze-dried strawberries and the first cup of chocolate chips with a silicone spatula until they are evenly distributed throughout the dough.
- Scoop and Bake: Use a cookie scoop (about 3 tablespoons) to portion the dough onto your prepared baking sheets, leaving about 2 inches of space between each one. Bake for 10 to 12 minutes. The edges should look set, but the centers will still be a bit gooey. That’s the secret to a chewy cookie!
- Cool Completely: Let the cookies cool on the baking sheet for about 15 minutes before transferring them to a wire rack to cool completely. They must be fully cool before you dip them in chocolate.
- Melt the Chocolate: While the cookies cool, prepare the coating. Place the remaining cup of chocolate chips and the coconut oil in a microwave-safe bowl. Microwave in 30-second bursts, stirring well between each, until the chocolate is smooth and fully melted. The coconut oil gives the chocolate a beautiful sheen and helps it set perfectly.
- Dip and Drizzle: One by one, dip the bottom of each cooled cookie into the melted chocolate, letting any excess drip back into the bowl. Place the dipped cookies back on the parchment-lined sheet. If you have leftover chocolate, feel free to drizzle it over the tops for extra flair.
- Let It Set: Allow the cookies to rest at room temperature for at least 30 minutes, or until the chocolate is completely firm to the touch, before serving.
Tips & Tricks for the Best Cookies
Over the years, I’ve learned that a few small details can elevate a good cookie to a great one. For these Chocolate Covered Strawberry Cookies, paying attention to ingredient quality and technique will reward you with an incredible texture and flavor. One of the most common issues in cookie baking is spreading. If your cookies turn out too thin, it’s often because the butter was too soft or melted. Your butter should be at a cool room temperature – soft enough to indent with your finger, but not greasy or shiny. If your kitchen is warm, don’t hesitate to chill the scooped dough balls in the refrigerator for 20-30 minutes before baking. This solidifies the fat, preventing it from melting too quickly in the oven and giving you a thicker, chewier cookie.
Perfectly Melting Chocolate
Melting chocolate can be tricky; it’s prone to seizing or burning if you’re not careful. The microwave method is quick, but it requires your full attention. The key is to use low power (or short intervals) and stir frequently. The residual heat will continue to melt the chips even after you take the bowl out of the microwave. Stirring is non-negotiable! The coconut oil not only adds a lovely gloss but also slightly thins the chocolate, making it easier to dip the cookies for a smooth, even coating. If you don’t have coconut oil, a teaspoon of any neutral vegetable oil will also work. Just be sure your bowl and spatula are completely dry, as any drop of water can cause the chocolate to seize up and become grainy.
FAQ: How do I know when the cookies are perfectly baked?
The visual cues for these cookies are key. Because they are dark from the cocoa powder, you can’t rely on them turning golden brown. Instead, look at the edges. They should appear dry, set, and slightly puffed. The very center of the cookie should still look a little soft and underdone. This is the sweet spot! They will continue to bake from the residual heat on the pan as they cool, resulting in that irresistible combination of a firm edge and a soft, gooey middle. Overbaking will lead to a dry, crumbly cookie, so it’s always better to err on the side of caution and pull them out a minute early.
Substitutions & Variations
While this recipe for Chocolate Covered Strawberry Cookies is fantastic as written, it’s also a wonderful base for experimentation. Baking should be fun, and adapting recipes to your taste is part of the joy. The most obvious area for customization is with the chocolate. The recipe calls for semisweet, which provides a balanced flavor that isn’t overly sweet, but you can easily swap it out. Or, why not mix and match? This is a great way to use up leftover baking chips you might have in your pantry from other Orzo Recipes or baking projects.
Chocolate and Fruit Swaps
- White Chocolate Strawberry: For a sweeter, creamier version, substitute the semisweet chocolate chips (both in the dough and for the coating) with white chocolate chips. The combination of white chocolate and strawberry is a classic for a reason.
- Dark Chocolate Raspberry: Swap the semisweet chips for bittersweet or dark chocolate (60-70% cacao) and use freeze-dried raspberries instead of strawberries for a more intense, tangy, and sophisticated flavor profile.
- Add a Little Crunch: For extra texture, consider adding ½ cup of chopped nuts like pecans, walnuts, or even pistachios to the dough along with the chocolate chips and strawberries.
FAQ: Can I make these cookies gluten-free?
Yes, you can adapt this recipe to be gluten-free with good results. The best option is to use a high-quality, measure-for-measure gluten-free all-purpose flour blend that contains xanthan gum. These blends are designed to be a direct substitute for regular flour in recipes like this one. Simply swap the 1 ¼ cups of all-purpose flour with the same amount of your chosen gluten-free blend. The texture may be slightly different—sometimes a bit more delicate—but they will still be absolutely delicious.
Frequently Asked Questions
Can I use fresh or frozen strawberries instead of freeze-dried?
Unfortunately, fresh or frozen strawberries are not a suitable substitute in this recipe. They contain a very high water content, which would release into the dough during baking. This excess moisture would make the cookies overly cakey, prevent them from spreading correctly, and potentially cause them to fall apart. Freeze-dried strawberries are essential for achieving the right chewy texture and concentrated fruit flavor.
How should I store these Chocolate Covered Strawberry Cookies?
Store the finished cookies in an airtight container at room temperature. They will stay fresh for up to 4 days. If you stack them, it’s a good idea to place a sheet of parchment paper between the layers to prevent the chocolate bottoms from sticking together, especially in a warmer environment.
Can I make the cookie dough ahead of time?
Absolutely! This dough is perfect for making ahead. You can prepare the dough, scoop it into balls, and place them on a baking sheet. Chill in the refrigerator for up to 3 days. When you’re ready to bake, just place the chilled dough balls on a parchment-lined sheet and add an extra minute or two to the baking time. You can also freeze the dough balls for up to 3 months for cookies on demand.
Conclusion
There’s nothing quite like the satisfaction of biting into a homemade cookie, especially one that feels as special as these Chocolate Covered Strawberry Cookies. The deep chocolate flavor, the surprising bursts of sweet-tart strawberry, and the crisp shell of the chocolate coating all come together to create a truly memorable treat. It’s a recipe that proves you don’t need complex techniques to produce something elegant and deeply satisfying. This is more than just a Creamy Chicken dish; it is a dessert that tells a story of classic flavors reimagined. I hope you enjoy the process of making these cookies as much as you enjoy sharing and eating them. They are a little bite of luxury, perfect for any occasion that calls for something sweet.
Chocolate Covered Strawberry Cookies
Ingredients
Equipment
Method
- Prep Your Station: First things first, preheat your oven to 350°F and line two large baking sheets with parchment paper. This prevents the cookies from sticking and makes cleanup a breeze.
- Cream Butter and Sugar: In a large bowl with a hand mixer or in the bowl of a stand mixer, beat the room temperature butter and brown sugar together on medium speed until the mixture is light, fluffy, and looks like wet sand. This should take about 2-3 minutes.
- Add Wet Ingredients: Scrape down the sides of the bowl. Add the egg and vanilla extract and beat again on medium-high speed for another 2 minutes until the mixture is pale and airy. This step incorporates air, which is key for a good cookie texture.
- Combine Dry Ingredients: Add the flour, cocoa powder, baking soda, baking powder, and salt to the bowl. Mix on the lowest speed until just a few streaks of flour remain. Don’t overmix here!
- Fold in the Good Stuff: Gently fold in the freeze-dried strawberries and the first cup of chocolate chips with a silicone spatula until they are evenly distributed throughout the dough.
- Scoop and Bake: Use a cookie scoop (about 3 tablespoons) to portion the dough onto your prepared baking sheets, leaving about 2 inches of space between each one. Bake for 10 to 12 minutes. The edges should look set, but the centers will still be a bit gooey. That’s the secret to a chewy cookie!
- Cool Completely: Let the cookies cool on the baking sheet for about 15 minutes before transferring them to a wire rack to cool completely. They must be fully cool before you dip them in chocolate.
- Melt the Chocolate: While the cookies cool, prepare the coating. Place the remaining cup of chocolate chips and the coconut oil in a microwave-safe bowl. Microwave in 30-second bursts, stirring well between each, until the chocolate is smooth and fully melted. The coconut oil gives the chocolate a beautiful sheen and helps it set perfectly.
- Dip and Drizzle: One by one, dip the bottom of each cooled cookie into the melted chocolate, letting any excess drip back into the bowl. Place the dipped cookies back on the parchment-lined sheet. If you have leftover chocolate, feel free to drizzle it over the tops for extra flair.
- Let It Set: Allow the cookies to rest at room temperature for at least 30 minutes, or until the chocolate is completely firm to the touch, before serving.