There are some recipes that are more than just food; they’re a direct line to the past, a taste of tradition that fills the kitchen with warmth and nostalgia. This Polish Kolachki Cookies recipe is exactly that for my family. Every holiday season, the familiar scent of these buttery, flaky pastries baking in the oven signals that the celebrations have truly begun. They are incredibly simple, made with a magical three-ingredient cream cheese dough that bakes into the most tender, melt-in-your-mouth cookie you can imagine. Each one is a small, precious package, holding a sweet jewel of fruit preserve in its center. Making them is a ritual, a joy, and a tradition I cherish more with each passing year.
What makes these Polish holiday cookies so special isn’t a long list of fancy ingredients, but the technique and the love baked into them. The dough itself contains no sugar, which is always a surprise to people. All the sweetness comes from the rich fruit filling and the generous dusting of powdered sugar after they’ve cooled. This perfect balance creates a sophisticated, lightly sweet cookie that is dangerously easy to eat. Whether you have Polish roots or are just looking for a truly standout cookie for your holiday platter, these Kolachki are a must-try. They connect us to generations of bakers who understood that the best things in life are often the simplest, made with care and meant to be shared.
What Are Polish Kolachki Cookies?
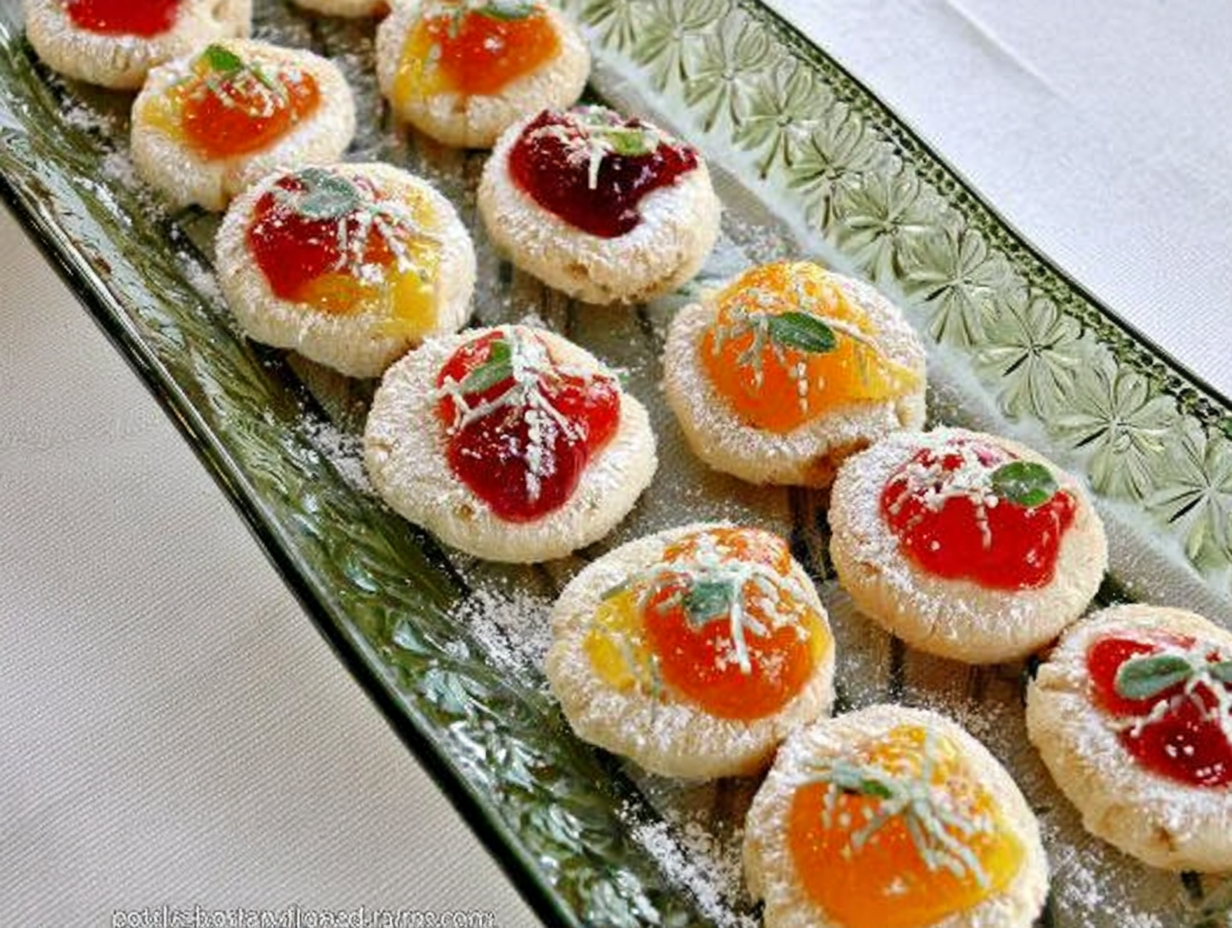
Polish Kolachki Cookies are a traditional pastry beloved in Poland and across Central and Eastern Europe, especially during holidays like Christmas and Easter. At their heart, they are delicate, folded cookies made from a uniquely rich and tender dough. Unlike most cookie recipes, the classic Kolachki dough is made without sugar, relying instead on a simple combination of butter, cream cheese, and flour. This trio creates an unbelievably flaky, almost pastry-like texture that is the signature of a true Kolachki. The magic happens in the oven as the high fat content from the butter and cream cheese creates steam, separating the dough into delicate layers. The result is a cookie that is both wonderfully soft and delightfully crisp at the edges.
The cookies are traditionally cut into squares or circles, a dollop of thick fruit preserve or other sweet filling is placed in the center, and then the corners are folded over to create the classic envelope or diamond shape. While baking, they puff up beautifully, creating a perfect little package for the sweet filling inside. Once cooled, a final dusting of confectioner’s sugar adds a touch of sweetness and a beautiful, snowy finish. These aren’t just cookies; they are a cherished part of Polish culinary heritage, a recipe passed down through generations, with each family adding their own subtle twist. Making a batch of Polish Kolachki Cookies is more than just baking; it’s participating in a delicious, time-honored tradition.
The Magic of Cream Cheese Dough
The secret to authentic Kolachki lies entirely in the dough. The inclusion of cream cheese is a stroke of genius. It provides fat and moisture, which tenderizes the gluten in the flour, preventing the cookies from becoming tough. This results in a final texture that is closer to a tender pastry or a biscuit than a standard cookie. Chilling the dough is a critical, non-negotiable step. This allows the butter and cream cheese to solidify, which is essential for achieving those flaky layers. When the cold dough hits the hot oven, the butter and cream cheese melt quickly, releasing steam that pushes the layers of dough apart. This process, similar to making laminated dough for croissants but infinitely simpler, is what gives Kolachki their signature melt-in-your-mouth quality.
FAQ: Why is there no leavening agent like baking powder in this recipe?
You might notice that this recipe for Polish Kolachki Cookies doesn’t call for any baking powder or baking soda. That’s not a mistake! The lift and puffiness in these cookies come entirely from the steam created by the high fat content of the butter and cream cheese as they bake. This method of leavening is what creates the delicate, flaky layers that are so characteristic of this traditional pastry.
Ingredients for Polish Kolachki Cookies
- Unsalted Butter: 16 tablespoons (2 sticks), softened to room temperature
- Cream Cheese: 16 ounces (2 packages, full fat), softened to room temperature
- All-Purpose Flour: 2 1/2 cups, plus more for dusting your work surface
- Fruit Preserves: About 1/2 cup of your favorite thick fruit preserves (apricot, raspberry, and prune are traditional)
- Confectioner’s Sugar: For dusting the finished cookies
How to Make Polish Kolachki Cookies Step-by-Step
- Make the Dough: In the bowl of a stand mixer fitted with the paddle attachment, or in a large bowl with a hand mixer, beat the softened butter and cream cheese together on medium speed until smooth and creamy. There should be no lumps.
- Add the Flour: Scrape down the sides of the bowl. With the mixer on low, gradually add the flour, mixing until it’s just combined and a soft dough forms. Be careful not to overmix.
- Chill the Dough: Turn the dough out onto a lightly floured surface and gently gather it into a cohesive ball. Divide it in half, form each half into a flat disc, and wrap each disc tightly in plastic wrap. Refrigerate for at least 2 hours, or even better, overnight. This step is crucial for the texture and makes the dough much easier to handle.
- Prepare for Baking: When you’re ready to bake, preheat your oven to 375°F (190°C). Line two large baking sheets with parchment paper or silicone baking mats.
- Roll and Cut: Take one disc of dough from the refrigerator. On a lightly floured surface, roll it out until it is about 1/8-inch thick. Using a sharp knife or a pizza cutter, cut the dough into 2-inch squares.
- Fill and Fold: Place about ½ teaspoon of your chosen fruit preserves in the center of each square. To form the classic Kolachki shape, take two opposite corners of the square and bring them to the middle, overlapping them slightly. Press down firmly to seal the corners together so they don’t pop open during baking.
- Bake the Cookies: Carefully place the formed cookies on your prepared baking sheets, about an inch apart. Bake for 10-12 minutes, or until the bottoms are lightly golden brown. The tops will still be pale.
- Cool and Dust: Let the cookies cool on the baking sheet for a few minutes before transferring them to a wire rack to cool completely. Once cool, dust them generously with confectioner’s sugar. These delicious Polish Kolachki Cookies are best enjoyed the same day they are made.
Tips & Tricks for Perfect Polish Kolachki Cookies
Making these cookies is a joy, but a few key tips can elevate your batch from good to absolutely perfect. First and foremost, ensure your butter and cream cheese are truly at room temperature before you begin. This allows them to blend into a perfectly smooth, homogenous base. If they are too cold, you’ll end up with lumps in your dough, which will prevent that uniform, flaky texture we’re aiming for. Another crucial tip involves the filling. It is essential to use thick, high-quality fruit preserves or solo filling. A thinner jam or jelly has too much water content and will likely bubble over and leak out during baking, creating a sticky mess and leaving you with a hollow cookie. A thick, sturdy filling will stay put, creating that perfect jewel-like center in your Polish holiday cookies.
The chill time is not a suggestion; it’s a requirement. Don’t be tempted to rush this step. Chilling the dough for at least two hours solidifies the fats, which is what creates the flaky layers during baking. It also makes the soft, sticky dough much easier to roll out. When you do roll it, work with one disc of dough at a time while keeping the other in the refrigerator. If the dough becomes too soft while you’re working with it, don’t hesitate to pop it back in the fridge for 10-15 minutes to firm up again. Finally, when you fold the corners over the filling, press them together with purpose. A firm press will help seal the cookie and prevent it from popping open in the oven’s heat, ensuring your beautiful Polish Kolachki Cookies keep their classic shape.
Substitutions & Variations
While the classic recipe for Polish Kolachki Cookies is a thing of beauty, there’s always room for a little creative variation. The most obvious place to play is with the fillings. While apricot and raspberry are traditional favorites, feel free to experiment! Prune butter (lekvar), poppy seed filling, or a thick cherry preserve are all wonderful and authentic options. You could even try a sweet nut filling made from ground walnuts, sugar, and a little milk, or a sweetened cheese filling. The key is to ensure any filling you use is thick enough to hold its shape during baking.
In terms of the dough, this cream cheese version is arguably the most popular for its tender, flaky results. However, some traditional recipes call for sour cream instead of or in addition to the cream cheese, which yields a slightly tangier and equally tender dough. If you need to make these gluten-free, a high-quality measure-for-measure gluten-free flour blend can be substituted, though the texture may be slightly more delicate. You can also change up the shape. Instead of squares, you can use a round cookie cutter and fold the sides over the middle to create a different look. No matter the variation, the spirit of this beloved Polish cookie recipe remains the same.
Frequently Asked Questions about Polish Kolachki Cookies
Can I make the dough ahead of time?
Absolutely! The dough for these Kolachki is perfect for making ahead. You can prepare the dough, wrap it tightly in plastic wrap, and store it in the refrigerator for up to three days before rolling and baking. This makes it a fantastic option for holiday baking when you want to spread out the workload.
Why did my cookies open up while baking?
This is a common issue! There are two main culprits. First, you might be overfilling the cookies. Use only about half a teaspoon of preserves per cookie. Too much filling will bubble up and force the seams open. Second, make sure you are pressing the two opposite corners together very firmly in the center. A light touch isn’t enough to create a strong seal.
How should I store Polish Kolachki Cookies?
These cookies are at their absolute best the day they are baked. However, they can be stored in an airtight container at room temperature for 2-3 days. The powdered sugar may dissolve a bit over time, so you might want to give them a fresh dusting just before serving. Avoid refrigerating the baked cookies, as it can make them dry.
Conclusion
Baking a batch of Polish Kolachki Cookies is about so much more than following a recipe. It’s an invitation to slow down, to connect with a rich culinary tradition, and to create something truly special with just a few simple ingredients. The process itself is a quiet joy—the smoothness of the cream cheese dough, the satisfying task of rolling and folding, and the wonderful aroma that fills your home as they bake. Seeing the pale, tender cookies emerge from the oven, ready for their final dusting of snow-like sugar, is a genuinely rewarding moment. They are a testament to the idea that you don’t need complexity to achieve elegance.
I hope you’ll bring this recipe into your own kitchen and make it a part of your traditions, whether for a holiday or just a quiet weekend. Sharing a plate of these delicate, fruit-filled pastries is a simple, heartfelt way to show you care. So, roll up your sleeves, embrace the process, and enjoy every last bite of these wonderful Polish Kolachki Cookies. They are a little taste of history, a bite of comfort, and a sweet memory in the making.
Polish Kolachki Cookies
Ingredients
Equipment
Method
- Make the Dough: In the bowl of a stand mixer fitted with the paddle attachment, or in a large bowl with a hand mixer, beat the softened butter and cream cheese together on medium speed until smooth and creamy. There should be no lumps.
- Add the Flour: Scrape down the sides of the bowl. With the mixer on low, gradually add the flour, mixing until it’s just combined and a soft dough forms. Be careful not to overmix.
- Chill the Dough: Turn the dough out onto a lightly floured surface and gently gather it into a cohesive ball. Divide it in half, form each half into a flat disc, and wrap each disc tightly in plastic wrap. Refrigerate for at least 2 hours, or even better, overnight. This step is crucial for the texture and makes the dough much easier to handle.
- Prepare for Baking: When you’re ready to bake, preheat your oven to 375°F (190°C). Line two large baking sheets with parchment paper or silicone baking mats.
- Roll and Cut: Take one disc of dough from the refrigerator. On a lightly floured surface, roll it out until it is about 1/8-inch thick. Using a sharp knife or a pizza cutter, cut the dough into 2-inch squares.
- Fill and Fold: Place about ½ teaspoon of your chosen fruit preserves in the center of each square. To form the classic Kolachki shape, take two opposite corners of the square and bring them to the middle, overlapping them slightly. Press down firmly to seal the corners together so they don’t pop open during baking.
- Bake the Cookies: Carefully place the formed cookies on your prepared baking sheets, about an inch apart. Bake for 10-12 minutes, or until the bottoms are lightly golden brown. The tops will still be pale.
- Cool and Dust: Let the cookies cool on the baking sheet for a few minutes before transferring them to a wire rack to cool completely. Once cool, dust them generously with confectioner’s sugar. These delicious Polish Kolachki Cookies are best enjoyed the same day they are made.